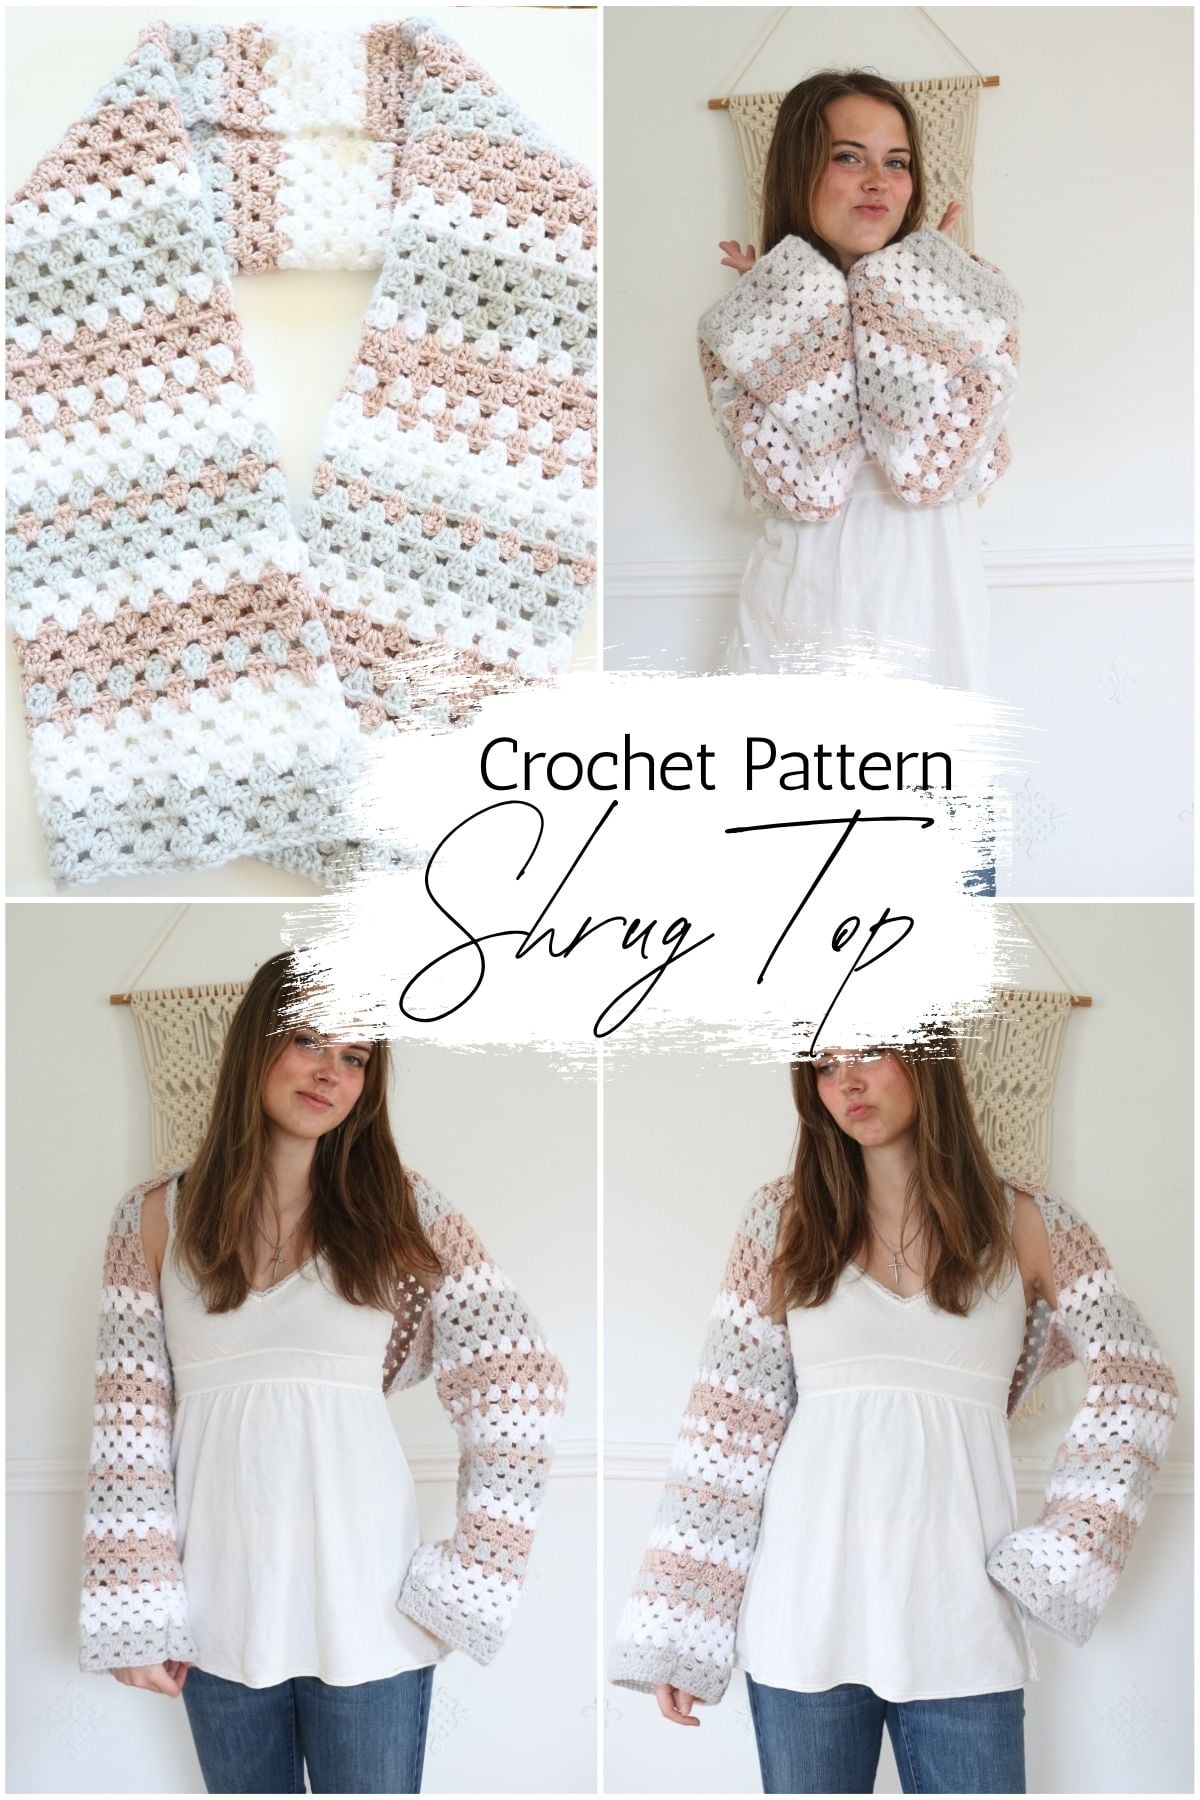
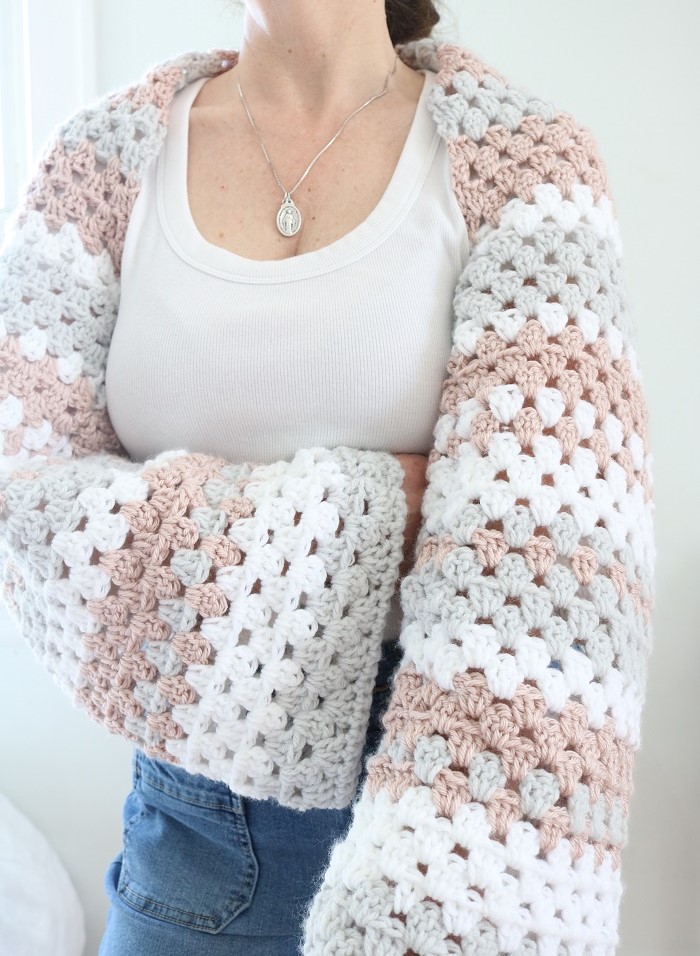
Free Granny Stripe Crochet Shrug Pattern – Easy Beginner Bolero
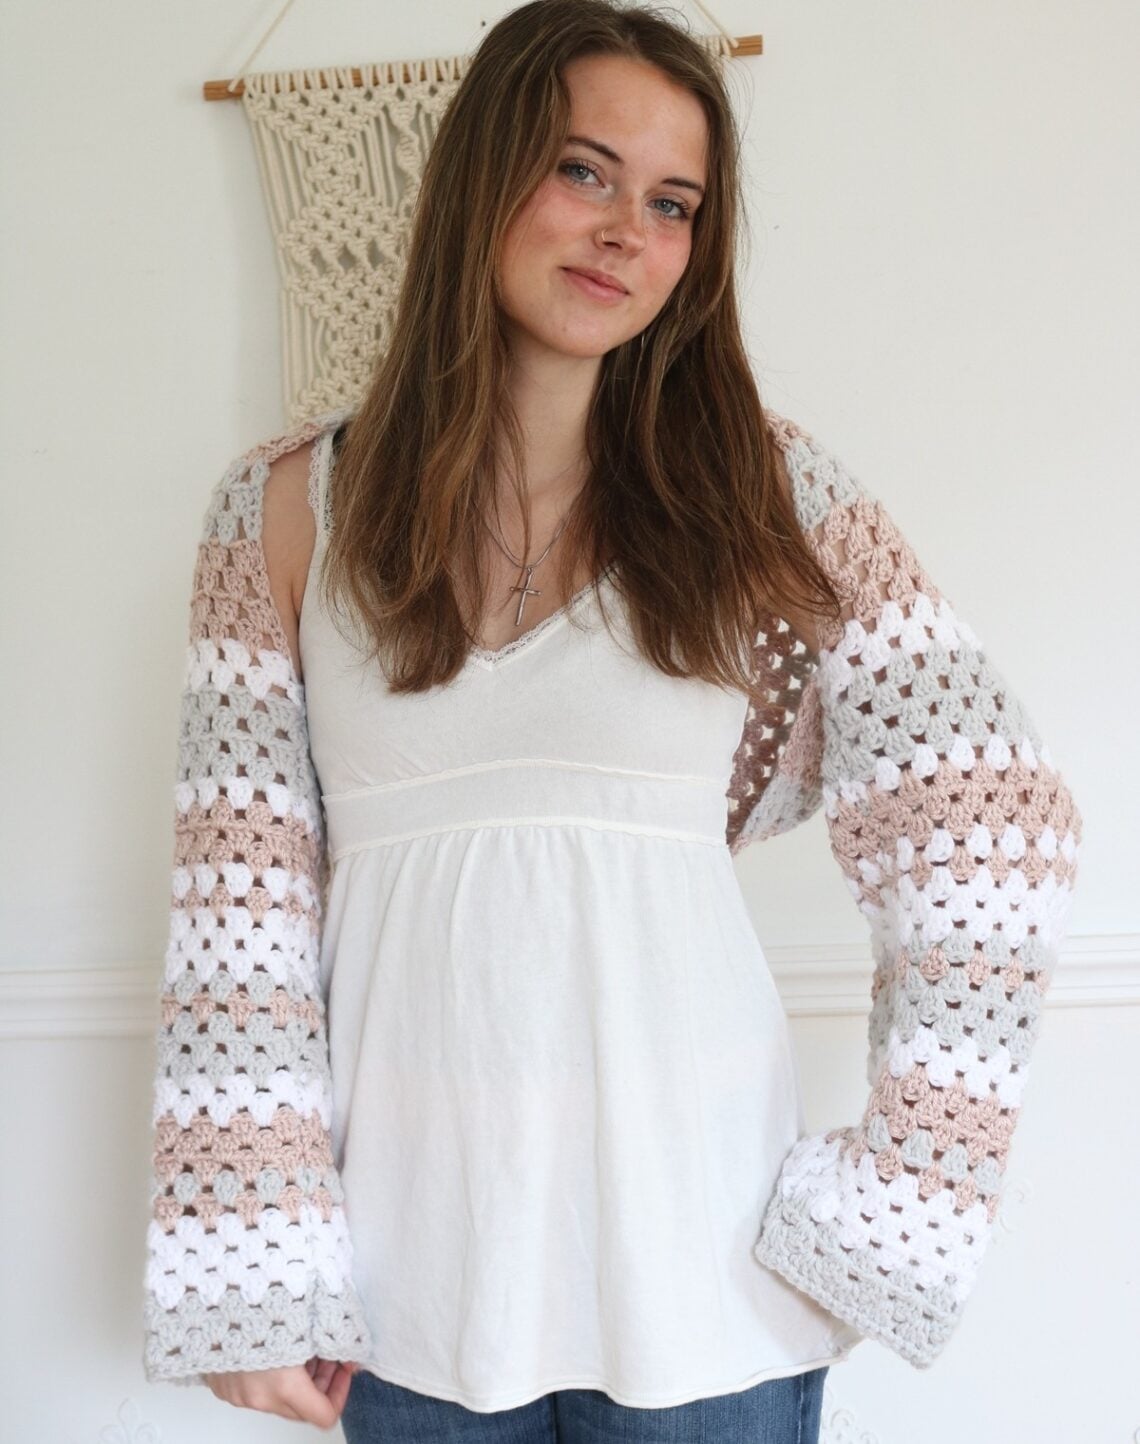
This free granny stripe crochet shrug pattern is one of the easiest garment projects you can make – even as a complete beginner. Worked in one long rectangle using basic double crochet stitches, it seams up into a cozy, colorful bolero-style shrug that you’ll want to wear with everything. With worsted weight yarn and a size J hook, it works up in about 8 hours and makes a perfect weekend project. I love crocheting shrugs as a long rectangle because you can try it on as you go and adjust the length to fit you perfectly – no guesswork needed.
Who is this for:
This pattern is great for:
- beginners learning garment construction
- anyone who loves colorwork without the complexity
- makers looking for a quick, wearable weekend project
- gift-makers who want something stylish and handmade
This easy crochet shrug pattern (updated for April 2026) includes tips for adjusting the size. The size as written should fit easily, but you can certainly make yours wider/longer/shorter. I’ve got all the details and step-by-step instructions for the shrug in the free pattern below, so keep reading. It may just become one of your favorite shrug patterns.
This post may contain affiliate links. That means if you click and buy, I may make a commission at no cost to you. Please see my full disclosure policy for more details.
At a Glance:
- Skill level: Beginner
- Yarn weight: Worsted (size 4)
- Hook size: J / 6mm
- Estimated time: ~8 hours
- Finished size: 18″ wide × 60″ long (before seaming)
- Construction: One rectangle panel, seamed long edges for sleeves
- Colors used: 3 colors in a granny stripe repeat
Free Granny Stripe Crochet Shrug Pattern
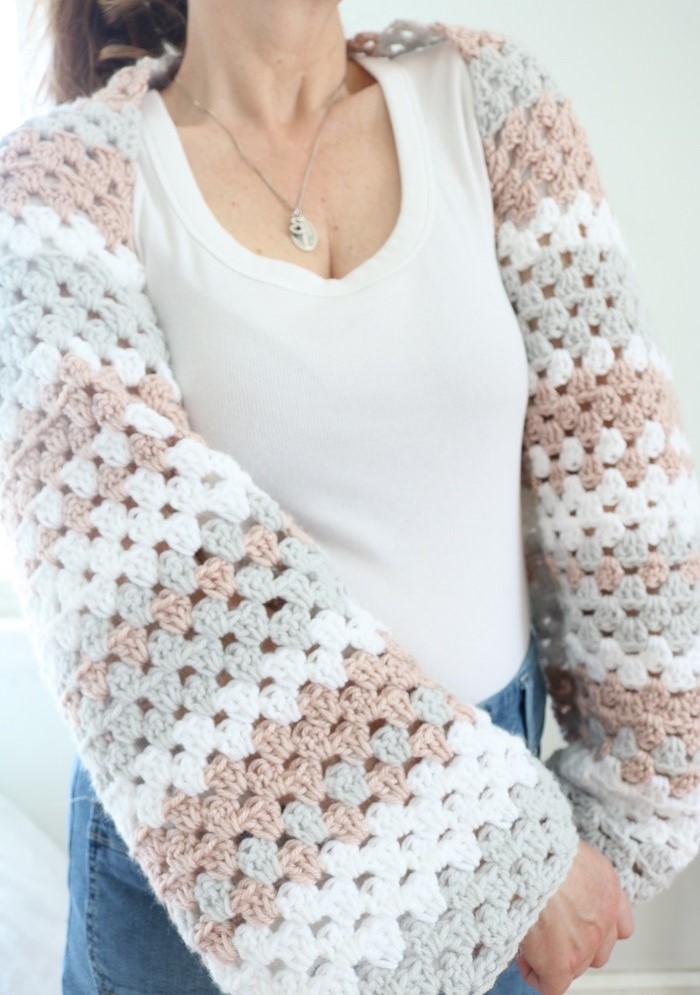
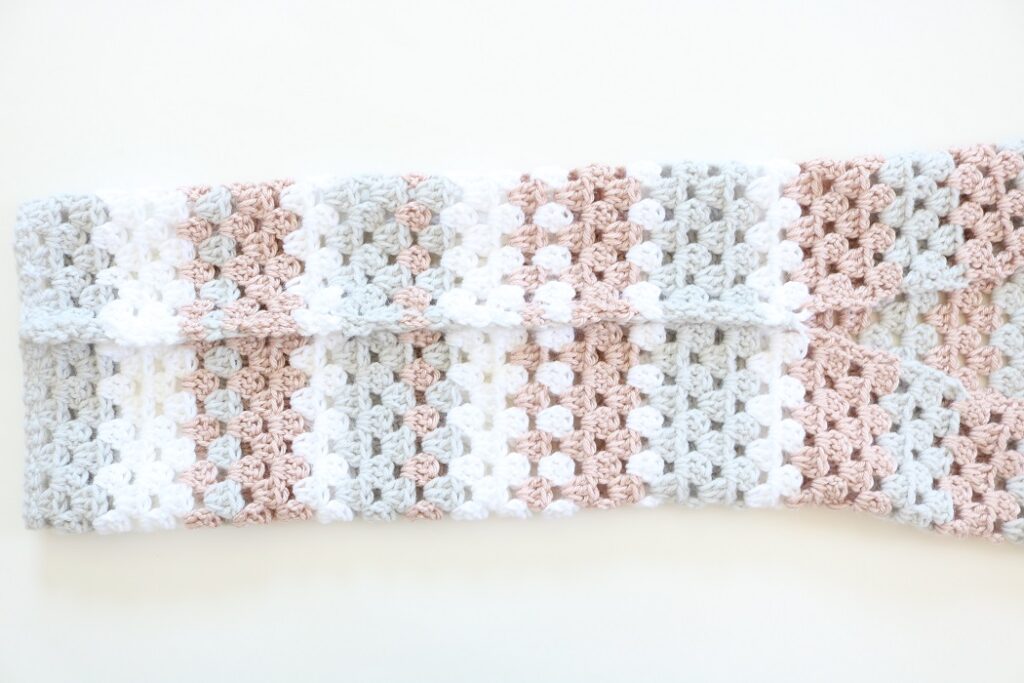
The idea behind a crochet shrug/bolero pattern is to create one big rectangle with BASIC CROCHET STITCHES, working in rows. You will be crocheting the shrug in one long panel, using 3 colors in a granny stitch pattern. You can decide which yarn colors to use for your rows. For symmetry, try to use the same mirrored stripe color pattern for both sides of shrug. Next, you will block the panel. Lastly, you will create two long sleeves by seaming together sections of the long edges of the panel, near where you want your arm holes. You will have created a cozy cocoon sweater!
The following is a list of supplies you would need to create one shrug. Feel free to use similar yarn (size 4, worsted weight yarn) and the same size crochet hook to make your own. This is a great way to use up scrap yarn. The easy shrug pattern shouldn’t take took long – about 8 hours total – so it’s a terrific weekend quick project!
Supplies
- Size J (6mm) hook size
- Size 4 Medium yarn weight –
- Lion Brand Pound of Love (1 skein = 1020 yds) in colors:
- A– White, 230 yds
- B – Elephant Gray, 270 yds
- C – A Little Blush, 270 yds (from Schitts Creek Lion Brand yarn: now discontinued, but Basic Stitch Blush Heather is similar)
Basic Stitch Anti Pilling Yarn

Bright Hooks (various sizes)

Lion Brand Pound of Love Yarn
🧶 Great for Scrap Yarn!
This shrug is a wonderful stash-buster. As long as your yarn is worsted weight (size 4), you can mix and match any colors you have on hand. Neutral tones create a timeless, wearable look; bold contrasting stripes give it a fun, eye-catching feel. Just make sure each individual row uses the same yarn weight to keep your tension even throughout.
Crochet Notions
Crochet Abbreviations
US Crochet terminology is used. (US terms)
Ch – chain
dc – double crochet
sc – single crochet
rep – repeat
sl st – slip stitch
sm – stitch marker
st(s) – stitch(es)
tch – turning chain
RS – Right Side
WS – Wrong Side
PATTERN INFORMATION
The FREE simple shrug crochet pattern for the crochet shrug is provided below, friendly for beginner crocheters, but you can also get the ad-free, printable pdf pattern for the crochet shrug in the shop. The pdf has some helpful photos included, as well as the exact color stripe pattern I used:
(The premium Ad-Free PDF can also be purchased on ETSY)
How to Crochet a Granny Stripe Shrug Step by Step
Here I will walk you through each step of making a basic shape shrug, using your favorite colors. You will be using an easy granny stripe stitch pattern, repeated every 2 rows using mainly basic double crochet stitches. Feel free to design your own stripe pattern with contrasting colors.
Gauge: 4″ (10cm) square = 11 sts by 7 rows (in granny stitch pattern repeat).
The resulting simple rectangle panel will be 18″ width by 60″ length as written, but I provide tips to adjust to different sizes.
NOTE –
- Ch 1 does not count as a st.
- Ch 3 does count as a dc st.
- You can place a SM in top of tch of every row to keep track of first st.
Shrug Crochet Pattern
How to Crochet the Shrug Panel
Using size J crochet hook, ch 50 with your starting color yarn.
(The foundation row and final row form the sleeve edges.)
Foundation Row: Sc in 2nd ch from hook, sc in each ch to end. Turn. (49 sts)
Row 1: Ch 3 (counts as 1 dc), 1 dc into same place, skip 2 sc, *3 dc in next sc, skip 2 sc; rep from * across until last st, 2 dc into last sc. Turn. (49 sts)
Row 2: Ch 3 (counts as 1 dc), *3 dc into next sp between dc groups; rep from * across until tch, 1 dc into top of ch 3. Turn. (50 sts)
Row 3: Ch 3 (counts as 1 dc), 1 dc into same place, *3 dc into next sp between dc groups; rep from * across until tch, 2 dc into top of ch 3. Turn. (49 sts)
Rep Rows 2-3 until reach approx. 60″ length (about 106 rows), alternating yarn colors in various rows by breaking off yarn color at end of a row and joining with a new color at start of next row.
Final Row: Ch 1, sc in 1st st and in each st across.
Fasten off.
You can find the exact stripe pattern I used on my shrug in the ad-free PDF SHRUG PATTERN.
I worked a total of 106 rows, with each half (53 rows) being a mirror of the other.
How to Block and Finish Your Crochet Shrug
Determine which side you would like for the Right Side (RS).
Weave in all loose ends.
Block the long panel. Use steam blocking for acrylic yarn.
Wrap the shrug panel around your shoulders, centered.
Place stitch markers where you would like your sleeves to begin at your underarms.
For reference, I marked 34 rows from the edges.
With RS together, seam up long edge to create one sleeve, starting at stitch marker and working down to bottom of sleeve. Use any yarn color from your 3 colors to work the seam.
Ensure rows are properly aligned while seaming.
Repeat for 2nd sleeve.
I used a slip stitch to work the seam, but you can choose any method you prefer:
Weave in loose ends.
Turn shrug Right Side (RS) out after seaming sleeves.
Important Tips for Crocheting your Shrug
Some things to keep in mind as you work the shrug crochet pattern are:
- When crocheting the granny stripe rows, design your color stripe pattern for half the shrug, then work the mirror of that pattern for the rest.
- It’s a good idea to use a stitch marker (SM) to keep track of the first st in each row. It is the top of the turning chain (tch).
- Try to weave in the ends as you go during yarn color changes. Make sure to block the panel when finished so that it forms a straight-edged rectangle.
- Feel free to adjust size as follows (adjust chain count before you begin):
- chain more/less sts to adjust width; must be a multiple of 3, plus 2
- work more/less rows to adjust length
Finished Size
The finished piece measures approximately 18″ width by 60” length before seaming.

FAQ
Yes! A rectangle-construction shrug like this one is one of the most beginner-friendly garments you can crochet. You only need to know basic stitches – chain, single crochet, and double crochet – and the pattern repeats every two rows, so it’s easy to get into a rhythm. The seaming at the end is simple too.
Worsted weight (size 4) yarn is ideal for a cozy, year-round shrug like this one. For a lighter spring or summer version, you could substitute a DK weight (size 3) yarn and adjust your hook size accordingly. But just make sure to check your gauge before starting.
This particular shrug takes approximately 8 hours to complete from start to finish, making it a great weekend project. The repetitive granny stripe stitch pattern means you can work on it while watching TV or winding down in the evening.
To make the shrug wider, add more chains to your starting chain -> your count must be a multiple of 3, plus 2. To make it longer (or shorter), simply work more (or fewer) rows before finishing. You can try the panel on as you go to find your perfect fit.
A shrug covers your shoulders and upper arms, typically leaving the front open, while a bolero is slightly more structured and usually has a defined front closure or edge. In practice, the terms are often used interchangeably – this pattern works as both, depending on how you style it.
How to Style Your Granny Stripe Shrug
The bolero style crochet shrug makes a great layering piece. Just pull your arms into the sleeves and feel the extra warmth! Feel free to customize your shrug to your personal style by using different colors in your granny stripe rows. The stylish design of this shrug is on trend – you’re bound to get compliments from making this beautiful pattern. Isn’t it amazing what you can crochet with simple shapes? And stylish shrug crochet patterns will never disappoint.

Layer the shrug over a tank top or light shirt during the warmer months. You can wear it with different outfits – jeans, a dress, or shorts. The extra layer provides a little bit of extra warmth without getting too hot.


Don’t forget that this crochet shrug pattern is also available in an ad-free digital pdf pattern. The pdf has a few helpful photos and the exact color stripe pattern I used. Grab the CROCHET SHRUG pattern in my shop.
Love crochet garment patterns? Check out these other favorites…
Did you enjoy this free crochet pattern? The shrug would also make a lovely gift for a stylish friend during the spring and summer months. Plus it’s one of the easiest garments you can crochet, especially if you are a beginner.
Check out all of my FREE CROCHET PATTERNS HERE.
===> Remember to PIN for later! <===


One Comment
Susie in the country
Thanks for sharing your shrug pattern. A video would be helpful but I will give this a try! Thanks again.