
Sweater Scarf Crochet Pattern {FREE!}
A Timeless Crochet Layer You’ll Reach for All Season Long
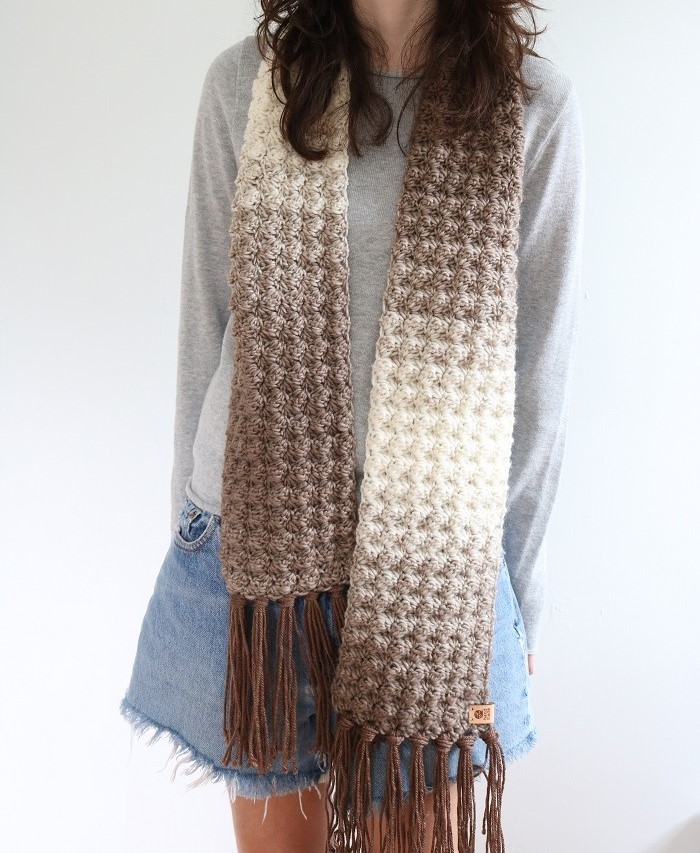
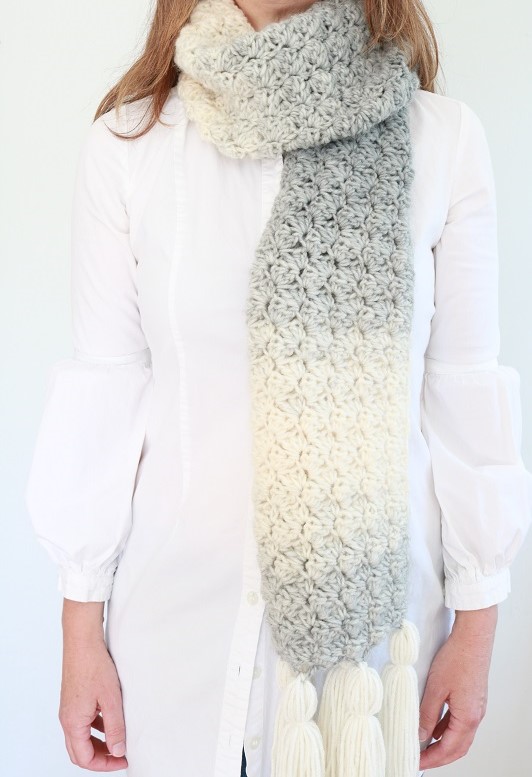
There’s something especially comforting about a handmade layer you can reach for again and again. This crochet sweater scarf pattern was designed for cozy mornings, cool evenings, and transitional seasons when you want warmth without bulk and style without effort. A sweater scarf, also known as a scarf with sleeves or crochet wrap sweater, is the kind of versatile piece that lives by the door, ready to be thrown on over jeans, simple dresses, and capsule wardrobe pieces. With its airy stitch repeat, relaxed drape, and a modern, minimal silhouette, this crochet sweater scarf offers a timeless project that feels just as good to make as it does to wear.

Why You’ll Love This Crochet Sweater Scarf Pattern:
A thoughtful handmade gift
Timeless, practical, and size-friendly, this crochet sweater scarf pattern makes a meaningful gift that feels special without being complicated to size or style. It’s also perfect for a bridal shrug – make one for yourself, and your bridal party!
Versatile, wearable design
This crochet sweater scarf combines the ease of a scarf with the comfort of a lightweight sweater, making it perfect for layering through fall, winter, and early spring.
Simple stitches with a polished look
The 4-row stitch pattern is easy to memorize and soothing to work, while still creating beautiful airy texture and drape that looks elevated and modern.
Effortless everyday styling
Designed to pair seamlessly with a capsule wardrobe, this scarf with sleeves works just as well over casual outfits as it does layered for a more refined look (like a bridal wrap).
Mindful, relaxing project
With a straightforward construction and minimal shaping, this crochet wrap sweater is ideal for slow stitching, evening crochet sessions, or peaceful weekend projects.
This post may contain affiliate links. That means if you click and buy, I may make a commission at no cost to you. Please see my full disclosure policy for more details.
Scarf With Sleeves Crochet Pattern Free
The idea behind this Simple Crochet Scarf Pattern Free is to create one long rectangle with BASIC CROCHET STITCHES working in rows, then adding ribbed sleeves. You will be crocheting the one main panel using a repetitive stitch pattern. Lastly, you will add ribbed sleeves to each short end.
The following is a list of supplies you would need to create one crochet sweater scarf. Use similar yarn (size 4, medium weight yarn) and the same crochet hook size to make your own.
Supplies
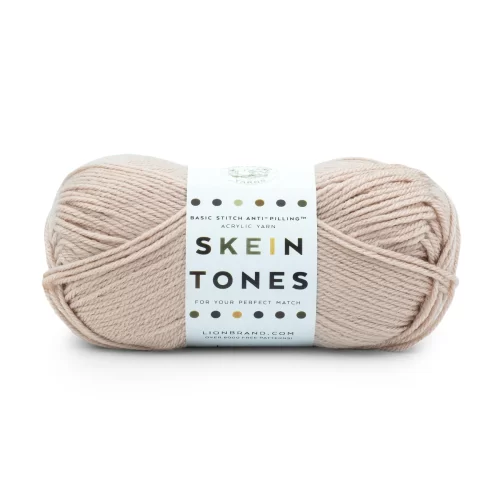
- Size 4 Medium yarn – Lion Brand Basic Stitch
- Approx 800 (950, 1285) yds (185 yds/3.5 oz/100g per skein)
- Color: Skein Tones “Ivory”
- or similar sized yarn
- Size I/9 (5.5 mm) hook (or size to meet gauge)

Crochet Notions
Crochet Abbreviations
US Crochet terms are used.
Ch – chain
Ch- – refer to chain or space previously made, e.g., ch-1 sp
dc – double crochet
BPdc – back post double crochet (work dc around back post of designated st)
FPdc – front post double crochet (work dc around front post of designated st)
rep – repeat
sc – single crochet
sm – stitch marker
st(s) – stitch(es)
tch – turning chain
PATTERN INFORMATION
The FREE Sweater Scarf Wrap pattern is provided below, but you can also get the ad-free, printable pdf pattern for the CROCHET SWEATER SCARF in the pattern shop! The pdf has helpful photos included:
(The premium Ad-Free PDF can also be purchased on ETSY)
How to Crochet a Sweater Scarf
How much yarn do I need to crochet a wrap crochet sweater?
For this Crochet Sweater Scarf Pattern Free, you’ll need plenty of size 4 Medium (worsted weight) yarn to make the main long panel that wraps around.
Here is the suggested yardage for the sizes:
Sizes XS/S (M/L, XL) -> Approx 800 (950, 1285) yds
Can a beginner crochet this scarf?
Yes, an enthusiastic advanced beginner can! Especially with a repetitive easy stitch pattern using basic crochet stitches and simple techniques. The Crochet Stitches For Scarf mainly use the sc and dc stitches.
You will also need to be familiar with the FPdc and BPdc stitches to work the ribbed sleeves in the round. But they are easy to learn.
How do you make this bridal shrug?
The sweater scarf would also make such a pretty bridal shrug! Wrap it over your gorgeous bridal gown, and let the lace stitching and ivory color (with a slight sheen) showcase this perfect bridal accessory.
Here I will walk you through each step of making this modern transitional season crochet scarf sweater, using your favorite yarn color.
Finished Measurements:
- Sizes XS/S (M/L, XL): 12 (14, 18)” depth by 96 (100, 108)″ total length
- Measurements are for finished sweater scarf, with sleeves being about 9″ long each
Gauge: 4″ (10cm) square = 14 sts by 8 rows

Sweater Scarf with Sleeves Pattern
First, you will crochet the main panel, from side-to-side in a ‘staggered triplets’ stitch pattern. This will create the main section that will be wrapped around the body. Next, you will add two sleeves to each short end of the panel, working a ribbed pattern in the round and decreasing st count by approx half for a snug fit. Next, you will seam together the long edges of the panel near the sleeves to extend them a bit. Lastly, you can block the sweater scarf if desired.
NOTE –
- Ch 1 does not count as a st.
- Ch 3 counts as 1 dc.
- Use a stitch marker (sm) to keep track of first st (tch) in each row and round.
Follow stitch and row counts using sizing: XS/S (M/L, XL)
Crochet Wrap Pattern Free
Using size I crochet hook, ch 44 (50, 65) with size 4 yarn.
Stitch counts (from 1st row) remain the same throughout panel.
Main Panel
First Short End Section
SC Row 1: Sc in 2nd ch from hook and in each ch across. Turn. 43 (49, 64) sts
SC Row 2: Ch 1, sc in 1st st and in each st across. Turn.
Staggered Triplets Pattern
Fnd Row (WS): Ch 1, sc in 1st st, *ch 2, sk next 2 sts, sc in next st; rep from * across. Turn.
Row 1 (RS): Ch 3 (counts as 1 dc), dc in same (1st) st, *sk next 2 chs, 3 dc in next sc st; rep from * across until last 2 chs, sk last 2 chs, 2 dc in last sc. Turn.
Row 2: Ch 1, sc in 1st dc, ch 1, sk next dc, sc in sp after 1st 2 dc sts, *ch 2, sc in sp between next 2 groups of dc sts; rep from * across until last 2 dc sts, ch 1, sk next dc, sc in last dc (3rd ch of tch). Turn.
Row 3: Ch 3 (counts as 1 dc), sk 1st ch, 3 dc in next sc st, *sk next 2 chs, 3 dc in next sc st; rep from * across until last 2 sts, sk last ch, dc in last sc. Turn.
Row 4: Ch 1, sc in 1st dc, *ch 2, sc in sp between next 2 groups of dc sts; rep from * across until last group of dc sts, ch 2, sc in last dc (3rd ch of tch). Turn.
Rep Rows 1-4 until piece measures approx 78 (82, 90)” (or your desired panel length), ending on a WS row.
Second Short End Section
SC Row 1 (RS): Ch 1, sc in each st and ch across. Turn. 43 (49, 64) sts
SC Row 2: Ch 1, sc in each st across. Turn.
Sleeves – Add 2
Now you will begin working the 1st sleeve in the round, with RS always facing.
Use a sm to keep track of 1st st in each round.
Work an odd number of sc sts for Round 1, evenly dispersed around edge of panel as follows:
Round 1: Ch 1 (does not count as a st), sc in 1st st, work sc2tog across rem sts, ending with an odd number of total sts.
Join with sl st to 1st sc.
For instance, I ended the size XS/S Round 1 with 23 sts total.
Stitch count (from 1st round) remains the same for the subsequent rounds.
Tip -> try on the sleeve here, & adjust this stitch count if you would like a looser or tighter sleeve fit (just remember to have an odd-numbered st count).
Round 2: Ch 3 (counts as 1st dc st), dc in next st and in each st around.
Join with sl st to top of ch 3.
Next, you will be working FPdc and BPdc stitches around to create the ribbed texture of the sleeve.
Round 3: Ch 3 (counts as 1st dc st), *1 FPdc around next st, 1 BPdc around next st; rep from * around. Join with sl st to top of ch 3.
Round 4: Ch 3 (counts as 1st dc st), alternate working FPdc around front posts and working BPdc around back posts all around. Join with sl st to top of ch 3.
Rep Round 4 until sleeve measures approx 9″ length or desired sleeve length.
Fasten off.
With RS facing, join yarn with size I crochet hook to corner of first short end section of panel.
Repeat above steps starting with Round 1 to add 2nd sleeve.
Seaming Tops of Sleeves
SEAM as follows:
Fold RS of panel together lengthwise.
Mark where you would like the upper part of your sleeves to end.
For instance, I marked my upper sleeve about 9″ from the beginning of each sleeve round.
Use yarn and a tapestry needle to seam the sides of the panel together to extend the sleeves up to your marked spot.
Be sure to align the panel together when seaming.
It’s a good idea to pin the panel together prior to seaming.
Finishing
Fasten off.
Weave in all loose ends to WS.
Turn sleeves RS out.
Blocking (optional)
If desired, block the finished sweater scarf to 12 (14, 18)” depth by 96 (100, 108)” total length.

Important Tips for Crocheting your Sweater Scarf
- It is a good idea to use a stitch marker to keep track of the first stitch in each row (and in each round for the sleeves).
- Pay attention to RS and WS rows.
- Feel free to customize the sweater scarf as follows:
- work more/less rows on the main panel if you would like the main length longer/shorter
- be sure to have enough yarn for these customizations
- customize the ribbed sleeves to your desired length and circumference
How to Wear a Sweater Scarf with Sleeves
- Cross in Back (Most Popular): Place the center of the scarf on your chest, take the sleeves to your back, cross them, and insert your arms.
- Cross in Front: Similar to the back method, but create the cross in front of your chest for a different look.
- Simple Drape/Wrap: Wear it like a traditional scarf by looping it around the neck, or drape it over shoulders for a shawl-like effect.
- Asymmetrical: Put on one sleeve and drape the rest of the fabric over the opposite shoulder.


Tips for the Best Look:
- Adjust: Adjust the back and front to ensure the “cross,” sits properly without pulling or feeling too tight.
- Prevent Gaps: Tug the sleeves up to your middle upper arm to ensure the scarf stays in place and covers your shoulders.
- Maximize Depth: Pull down the fabric to cover your upper arms and create a full, warm, and flattering drape.
Don’t forget that this Crochet Wrap Sweater is also available in an ad-free digital pdf pattern. The pdf has helpful photos. Grab the CROCHET SWEATER SCARF PATTERN in my shop.
Love Crochet Scarf Ideas? Check out these other crochet projects…
Did you enjoy this free crochet pattern? I think it’s also a perfect sweater scarf as a gift for a stylish friend for the transitional months.
===> Remember to PIN for later! <===


