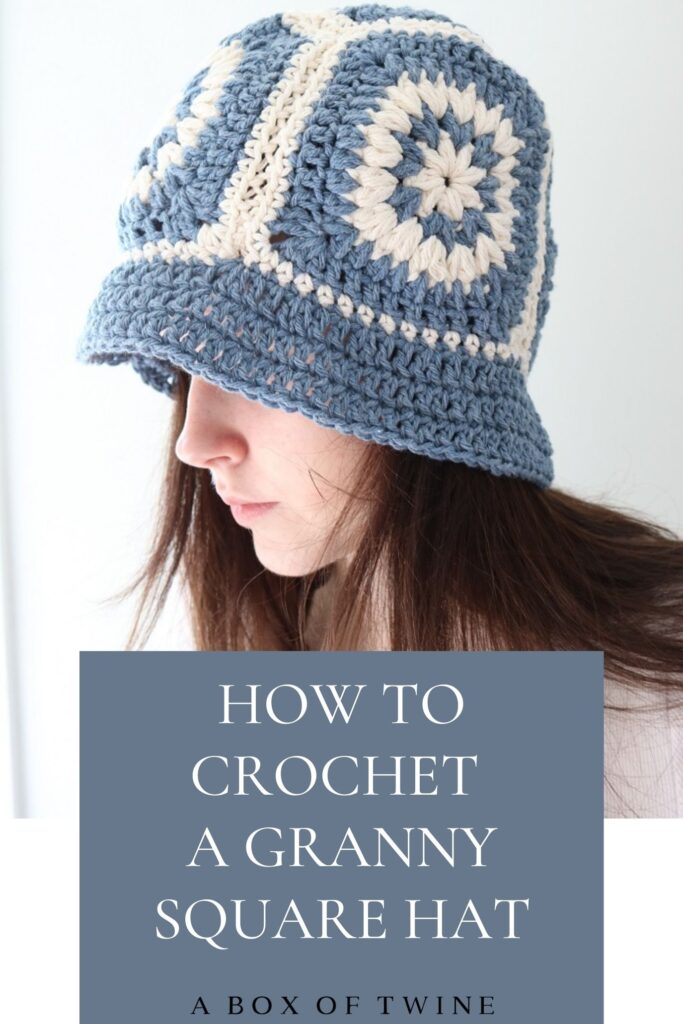
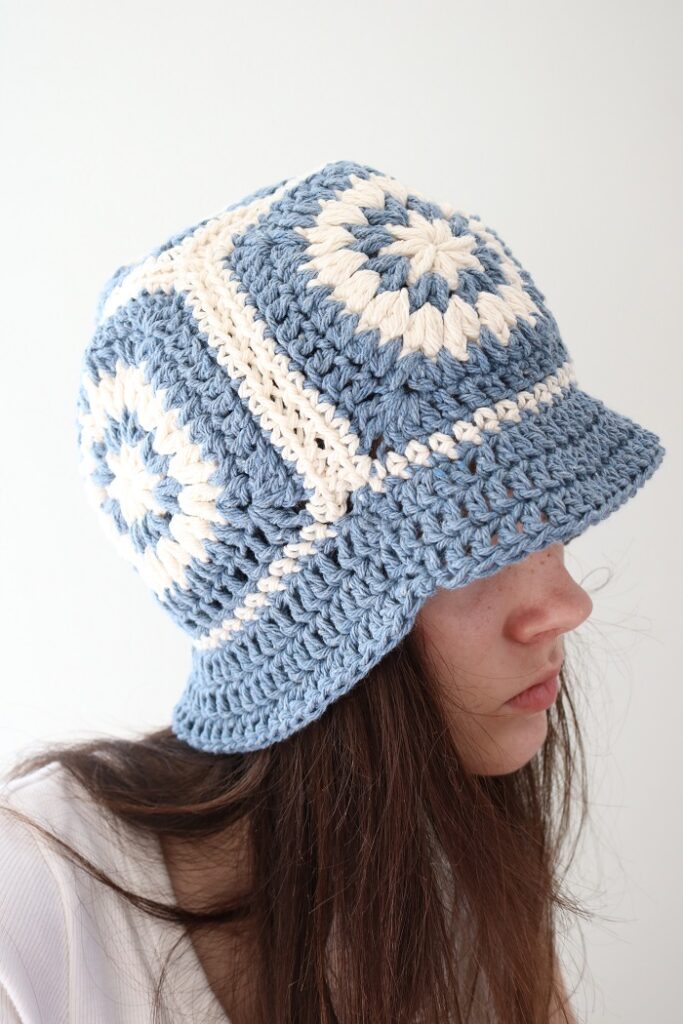
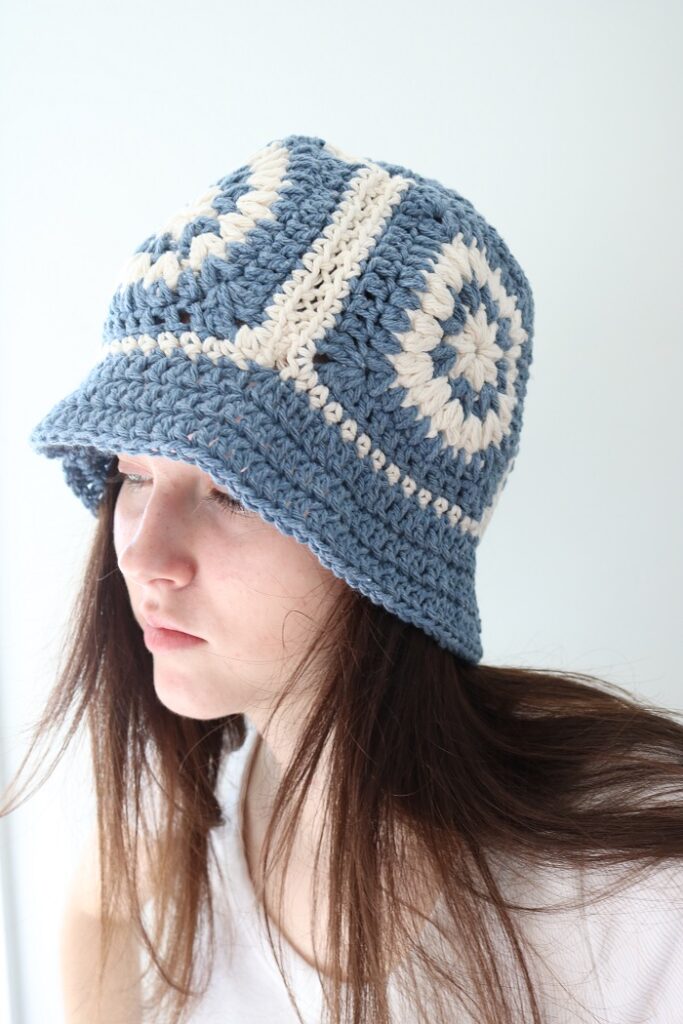
{FREE} Granny Square Bucket Hat Crochet Pattern
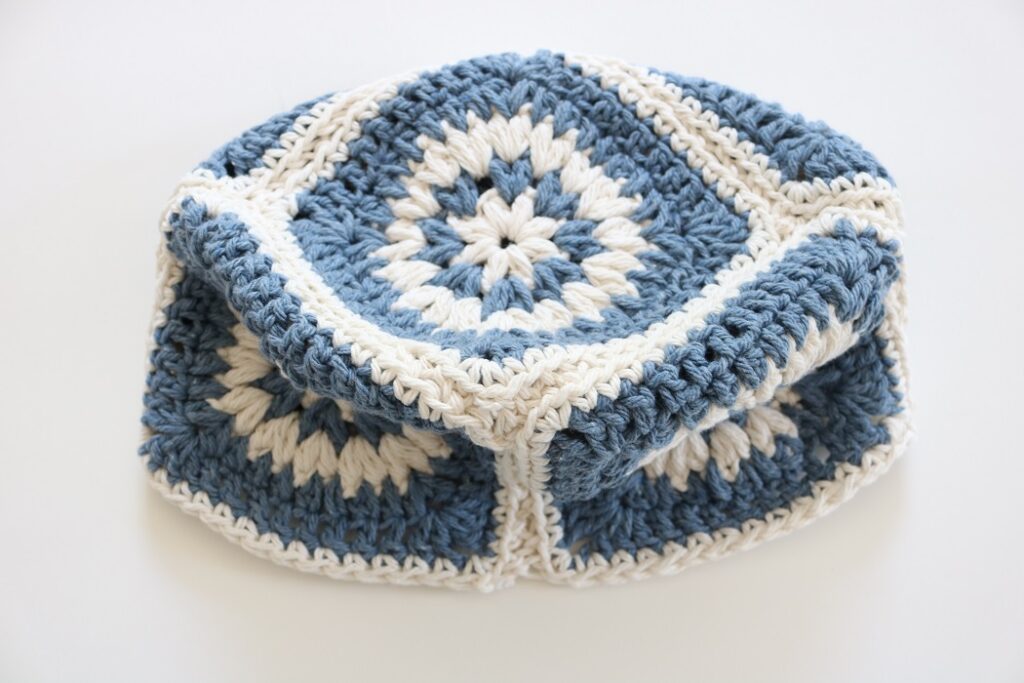
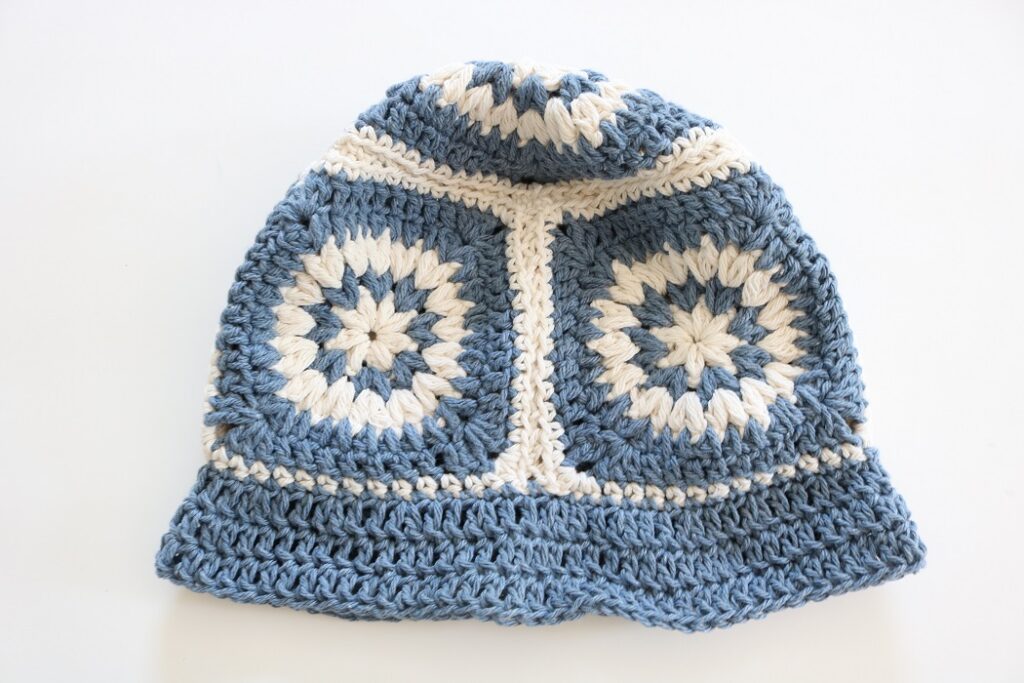
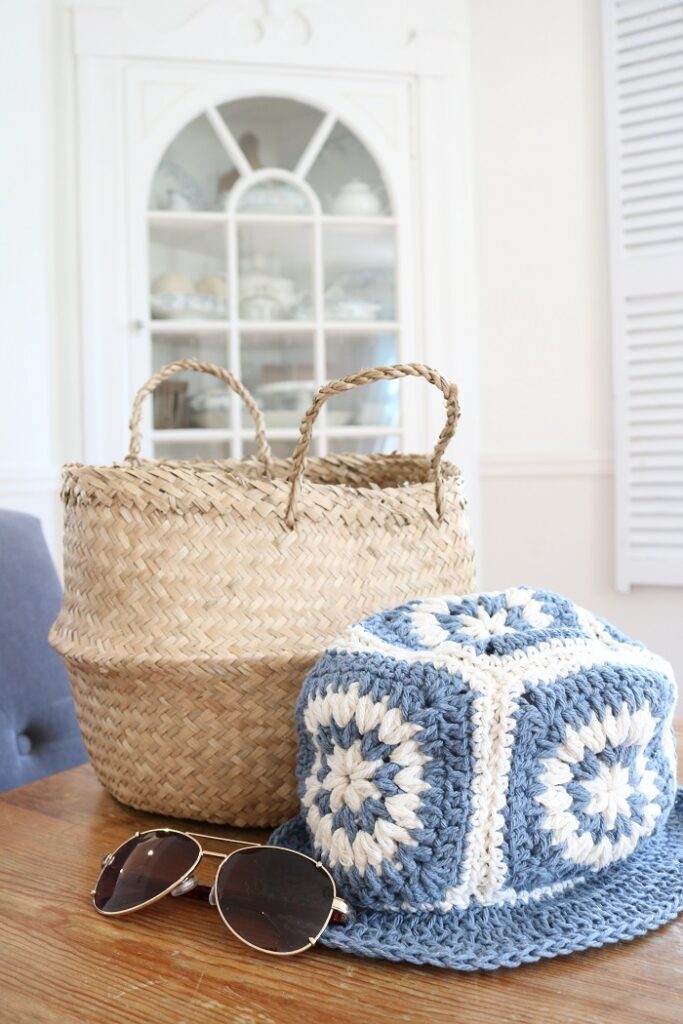
Do you love crochet granny squares? Do you love crochet bucket hats? You are in for a treat, because I’ve got a fabulous FREE granny square bucket hat pattern for you today! And are you wondering… how many granny squares do you need to make a hat? You’ll only need to crochet 5 granny squares to make this roomy bucket hat. Not bad! The nautical, summer colors are perfect for this star-spangled style hat. Give this free crochet pattern a try if you love crochet hats!
This post may contain affiliate links. That means if you click and buy, I may make a commission at no cost to you. Please see my full disclosure policy for more details.
Granny Square Hat Pattern
Each of the 5 squares of the bucket hat only takes 6 rounds to crochet. However, the skills needed to work the granny stitch, rounds, seaming, and hat brim are Intermediate skill level. But I think advanced beginners could give it a try.
You will need the following supplies to make the granny square bucket hat:
Supplies
- Size 4 medium (worsted weight yarn) cotton yarn – Sugar n Cream in each of these colors and yds:
- Color A: ‘Ecru‘ – 70 yds (from 1 skein)
- Color B (main color): ‘Blue Jeans‘ – 120 yds (1 full skein)
- (Other options for yarn are Lion Brand Re-Up or Knit Picks Dishie)
- Size G/6 (4.25 mm) hook (or size to meet gauge)
- Scissors
- tapestry (yarn) needle
- stitch markers
Abbreviations
US crochet terms are used.
Ch – chain
dc – double crochet
sc – single crochet
rep – repeat
[ ] – repeat what is inside brackets # of times indicated
sl st – slip stitch
st(s) – stitch(es)
sm – stitch marker
sp – space
pm – place marker
RS – Right Side
WS – Wrong Side
PATTERN INFORMATION
Recently I began naming my crochet and knit patterns after local New England places of interest.
This “Nantucket Granny Square Bucket Hat” is named after the coastal island town of Nantucket, MA. The vacation island is known for sailing regattas, historic cottages, and celebrity spotting, with its’ quintessential patriotic & traditional style. This star spangled style hat would fit in perfectly on summer days there, especially during the 4th of July holiday. Classic meets nautical!
The FREE square bucket hat crochet pattern is provided below.
- But you can get the ad-free, printable pdf pattern for the GRANNY SQUARE HAT in the SHOP! The pdf has step-by-step tutorial photos included, plus a diagram for assembly.
How to Crochet a Granny Square Hat
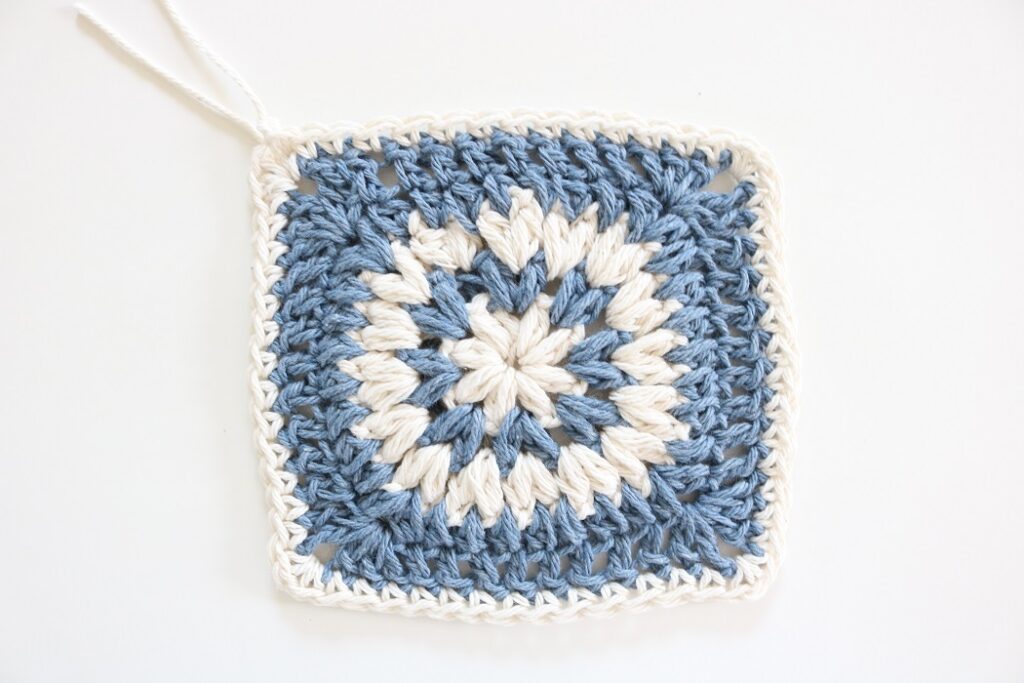
Gauge: 5.25″ (13.25 CM) SQUARE: 1 CROCHET SQUARE (blocked)
NOTES: You will crochet each of the 5 squares in the round, using 2 colors. The Right Side will always face you. Each square may take about ½ hour to crochet.
First, you will make a foundation ring and work 1 round with color A.
Next, you will work 5 more rounds, alternating colors with color B after rounds 1, 2, 3, and 5.
Next, you will seam together 5 of these squares into the hat shape.
Lastly, you will add edging to create the brim of the hat.
Special Stitch in pattern:
Puff: [yo, insert hook into sp indicated and pull up loop] twice, yo and draw through all 5 loops on hook. Puff counts as 1 st.
Instructions are as follows for each granny square…
Granny SQUARE Bucket Hat Pattern
NOTE –
- First Ch 1 does not count as a st, First Ch 3 does count as one dc st.
Foundation Ring: Using size G/6 crochet hook, ch 5 with color A and join with sl st to first ch to form a ring.
The first 3 rounds will form a circular piece of work:
Round 1: Ch 1, [Puff into the ring, ch 1] 8 times, change to color B when joining to top of first Puff with sl st. Break color A.
Round 2: Ch 1, *[Puff, ch 1] twice into next ch-1 sp; rep from * 7 more times, change to color A when joining to top of first Puff with sl st. Break color B.
Round 3: Ch 1, *[Puff, ch 1] twice into next ch-1 sp; rep from * 15 more times, change to color B when joining to top of first Puff with sl st. Break color A.
The next 3 rounds will form a square piece with 4 corners:
Round 4: Ch 1, *[puff, ch 1, puff] in next ch-1 sp (corner made), puff into next 7
ch-1 spaces; rep from * 3 times, join to ch-1 sp in corner with sl st.
Round 5: Ch 3 (counts as 1 dc), [1 dc, ch 2, 2 dc] in same corner ch-1 sp (corner made), * 1 dc in each of next 9 Puff sts**, [2 dc, ch 2, 2 dc] in next corner ch-1 sp (corner made); rep from * twice more and from * to ** once again. Join to ch-2 sp with sl st. Break Color B and fasten off.
Round 6: Join Color A to any ch-2 corner sp with sl st. Ch 1, *[sc, ch 1, sc] in corner ch-2 sp (corner made), 1 sc into each of next 13 dc sts; rep from * 3 times, join to first sc with sl st.
Break color A and fasten off.
One square finished.
How many granny squares does it take to make a hat?
Repeat the previous steps to make a total of 5 squares.
Finishing/Blocking
Weave in all loose ends on WS.
Block each square to 5.25″.
Assemble the squares so that one square forms the top of the hat and the other 4 squares form the sides.
SEAMING:
Use color A yarn and a tapestry needle to join the squares with an invisible seam along their side edges. See THIS POST for a step-by-step tutorial on working an invisible seam (with Right Sides together).
It may be best to join 2 side squares together, then join one of those sides to the top square. Next, work around the top square to join the remaining side squares to it. Lastly, join together the remaining side seams.
(The pdf DIGITAL PATTERN has a helpful diagram to follow for seaming)
Weave in ends after seaming:
EDGING FOR HAT BRIM: (use G/6 hook)
Use a stitch marker (SM) to mark the first st of each round.
With RS facing, join color B yarn to any seam st at bottom of hat.
Round 1: Ch 1, sc in each sc st (and seam st) around, ensuring that the total number of sts is a multiple of 3. (I worked 15 sc sts per square). Join to first sc with sl st.
Round 2 (increase round): Ch 1, *dc in next 2 sts, 2 dc in next st; rep from * around. Join to first dc with sl st.
Round 3: Ch 1, dc in each st around. Join to first dc with sl st.
Round 4 (optional): Rep Round 3 if you would like a wider brim (1.5″).
Fasten off.
Weave in ends.
Important Tips for Granny Square bucket hat pattern
Some things to keep in mind as you crochet the hat are:
- The hat is big and roomy per design, but feel free to go down size(s) in hook to create a smaller, fitted hat.
- When crocheting the squares in the round, the Right Side (RS) is always facing you.
- Try to crochet in a consistent manner so that the squares will be the same size.
- Make sure to block the squares prior to assembling them.
- Try on the hat as you work the brim to make it to a custom depth.
Finished Size
The finished crochet bucket hat will measure approximately 5.5” width of the sides and 1.5” wide brim. The circumference around the sides will be about 21”.
Wearing the Nantucket Granny Square Hat
You will love wearing this trendy granny square bucket hat with your spring or summer wardrobe to screen the sun. The nautical colors and star pattern on the square motif are fitting for a 4th of July party or lakeside getaway. The bucket hat would also look chic on a coastal shopping trip – fitting in perfectly with COASTAL GRANDMOTHER STYLE.
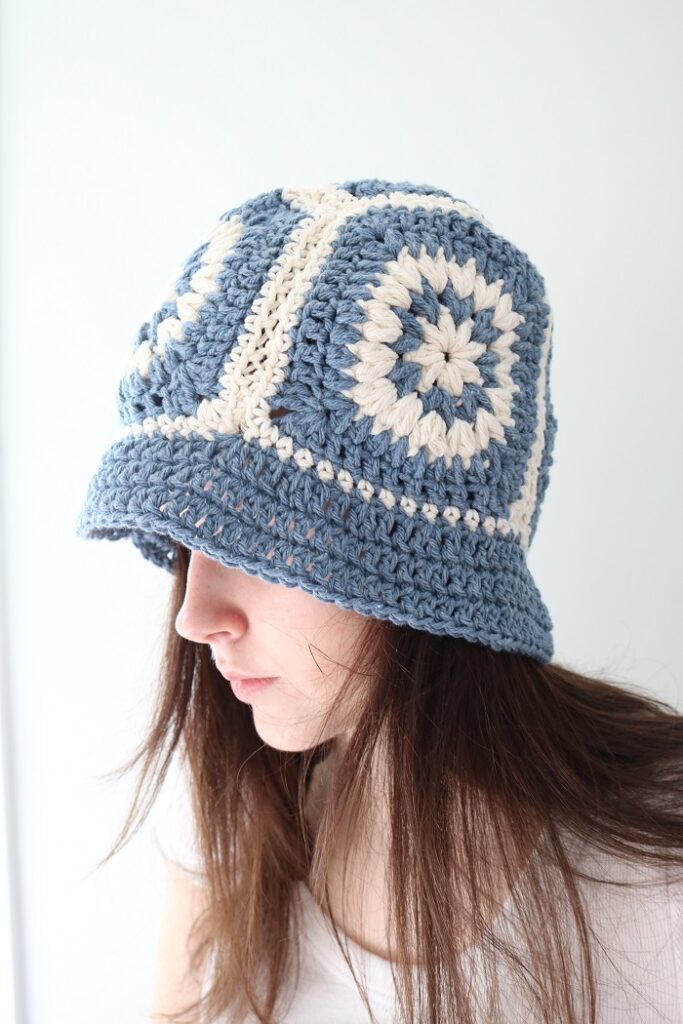
If you prefer bolder colors, you could certainly make a vibrant crochet bucket hat with colors that pop for the summer. You get to choose the color combinations for this simple bucket hat!
Did you enjoy this free pattern on how to crochet a granny square hat? The puff stitch make take some practice, but once you get the hang of it, the pattern is repetitive.
Don’t forget that this crochet pattern for a bucket hat made from granny squares is also available in a digital pdf pattern. The pdf has helpful photo tutorials. Grab the NANTUCKET BUCKET HAT pattern in my shop.
===> Remember to PIN for later! <===