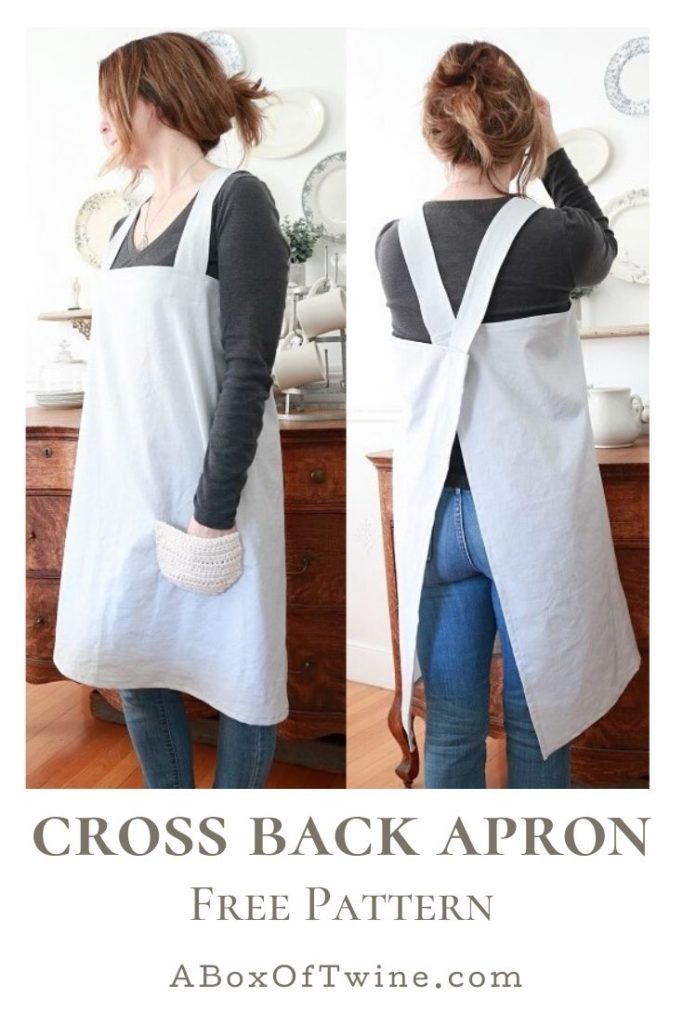
How to Make a Simple Cross Back Apron – Free Pattern
Keeping up with my craft theme this month of March (National Craft Month!), today I’m featuring a simple and classic cross back apron pattern. This style apron has been made popular by Japanese designs. I really appreciate the simplicity and ease of use for this particular apron. Just pull your arms and head through, then get to work.
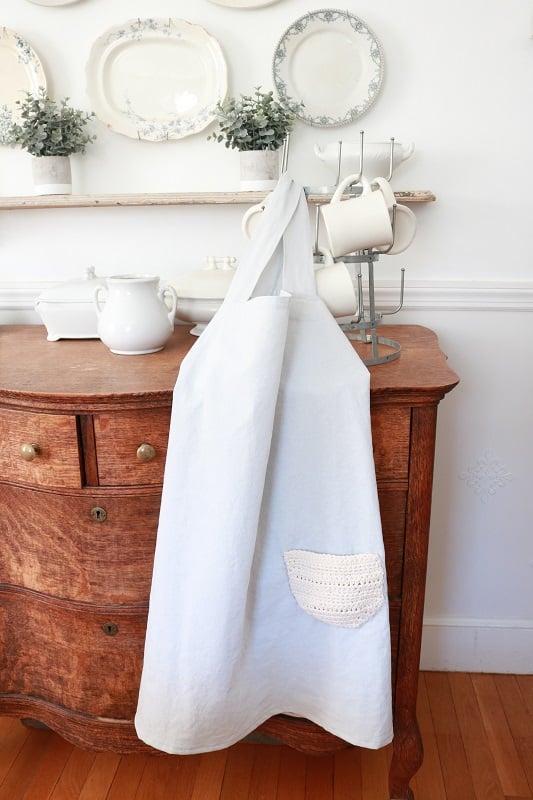
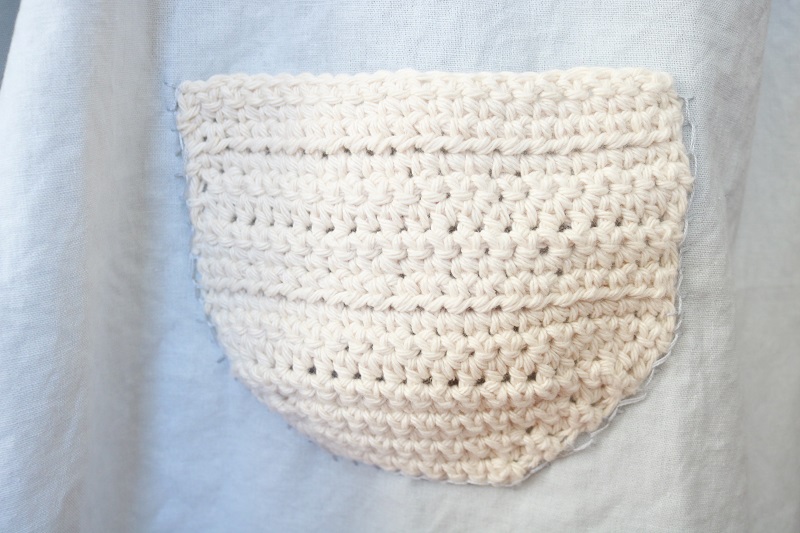
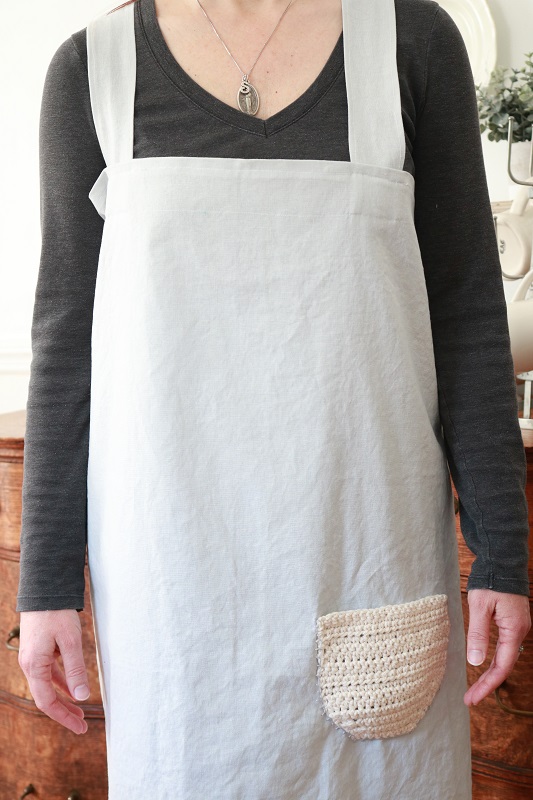
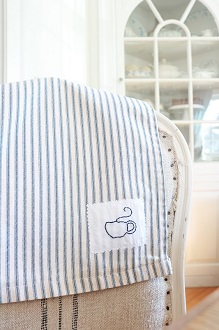
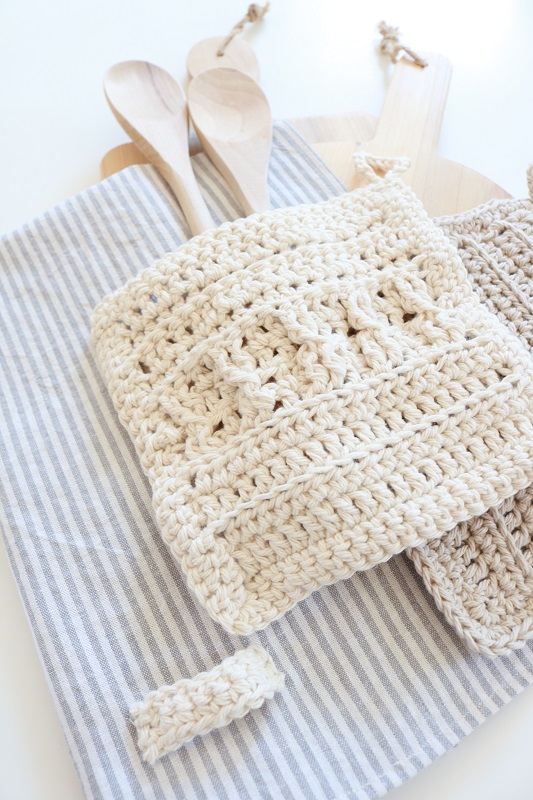
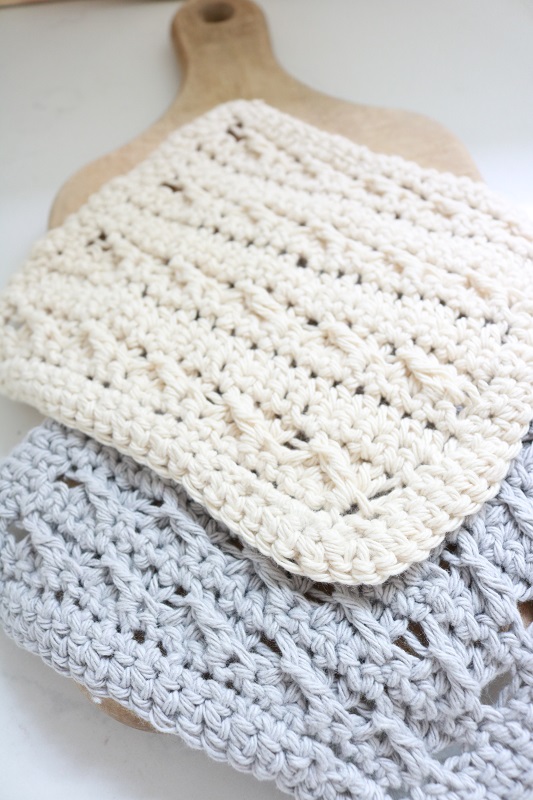
How is my pattern different? I made a crochet pocket instead of a fabric one. I love the contrast of the silver linen weave and the ivory crochet stitches. It’s still a practical pocket, but it looks even cuter.
Another unique feature of my pattern is that it only requires one yard of fabric. This post is one of many in my “ONE YARD WONDERS” series, where I attempt to provide simple patterns that only require one yard.
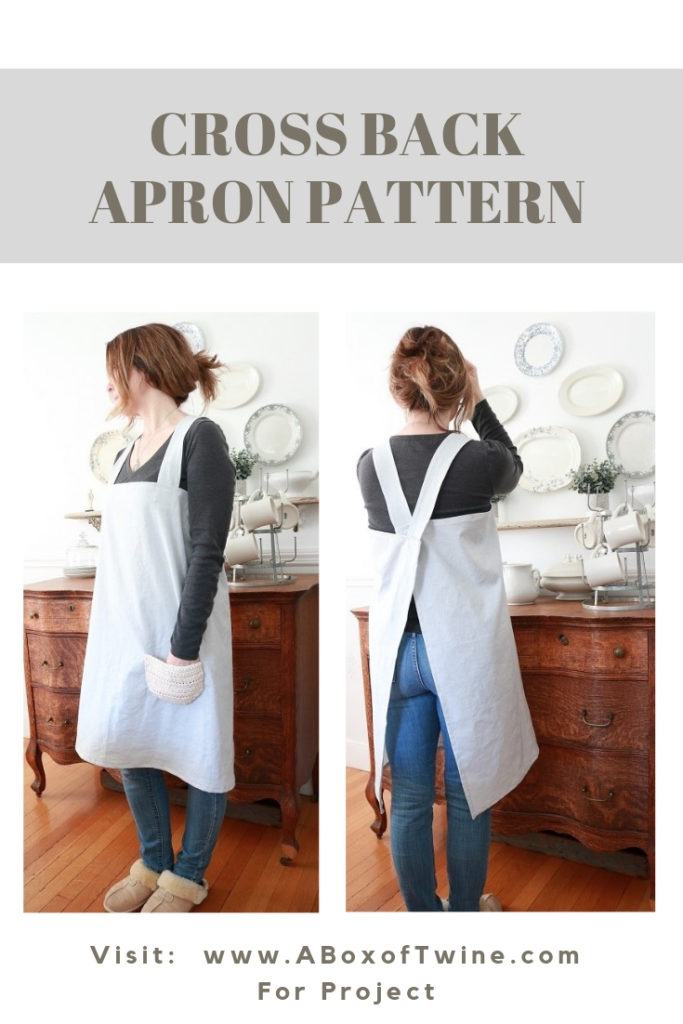
Can you envision using this apron in a farmhouse kitchen, country garden, or even out shopping or selling wares in the city? Pair it with jeans or a long flowing skirt and you’ve got a classic look.
Keep reading for the supplies needed, cuts required, and full FREE pattern.
Please note – this post contains affiliate links, which allows me to make a small commission from your purchase via the link without extra cost to you. See my Disclosures page and thank you!
Cross Back Apron Pattern
Skills needed
Basic machine sewing
Simple crochet (optional)
Simple embroidery (optional)
Supplies for Fabric
One yard of Linen or linen blend fabric.
My chosen fabric is a linen/cotton blend, but I think it would also look wonderful in 100% linen. (I used THIS LINEN BLEND FABRIC in the color silver. It comes in many colors and has a width of 44”)
Scissors, Pins, Thread, Sewing Machine
Measuring tape, Washable fabric marker
Iron
Supplies for Crochet Pocket (optional)
Approx. 30 yds of Medium Weight (4) Cotton yarn
(I used PREMIER HOME COTTON IN COLOR CREAM)
F (3.75 mm) crochet hook
Embroidery thread to attach pocket to apron
Embroidery needle
Pattern for Crochet Pocket (optional)
I designed the crochet pocket to be made top down, with a pattern of 2 SC rows followed by 1 HDC row prior to decreasing to shorter SC rows at the bottom of the pocket.
Here are the steps:
Chain 22.
Row 1: SC in 2nd chain from hook, then SC across. Turn. (21 stitches)
Row 2: Ch1. SC in 2nd st from hook, then SC across. Turn.
Row 3: Ch1. HDC in 2nd st from hook, then HDC across. Turn.
Rows 4 and 5: Repeat Row 2.
Row 6: Repeat Row 3.
Continue repeating the previous 3 rows (4-6) until you have 12 rows – basically a pattern of 2 SC rows followed by 1 HDC row.
Next you will begin a slight decrease in stitches.
Row 13: Ch1. SC in 2nd st from hook. SC2tog. SC across until 3 stitches left. SC2tog. SC last st. Turn. (19 stitches)
Row 14: Repeat Row 13. (17 stitches)
Row 15: Repeat Row 13. (15 stitches)
Row 16: Repeat Row 13. (13 stitches)
Row 17: Repeat Row 13. (11 stitches)
Row 18: Repeat Row 13. (9 stitches)
Row 19: Ch1. SC in 2nd st from hook, then SC across.
Fasten off. Weave in ends and iron pocket flat.
Instructions for Cross Back Apron
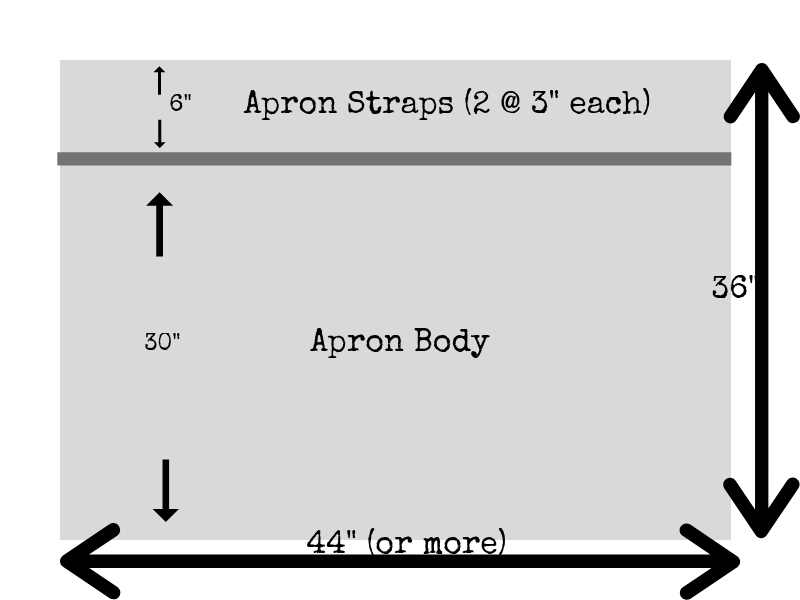
First you will need to wash and iron your fabric. I used 1 yard of a 44″ WIDTH FABRIC, but you may find a wider fabric which would be even better. The more width you have, the more your derrier will be covered.
The finished measurements of the apron body should be about 28″ tall by 42″ wide (wider for fabric with more width). The straps are about 2″ in width and will vary in length depending on your desired fit.
Cut out the pieces as follows. All measurements include seam allowance.
- Measure 6″ down from top of fabric yard and press.
- Cut across this fold, separating top 6″ of fabric from the yard.
- Fold this 6″ x 44″ strip in half lengthwise and press.
- Cut across this fold to create 2 raw strap pieces at 3″ x 44″ each.
Step 1 – Make 2 Apron Straps
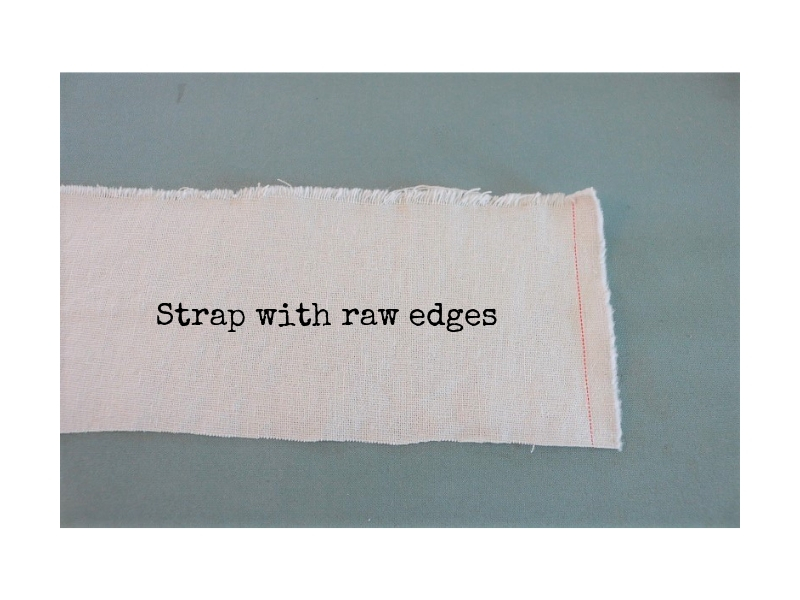
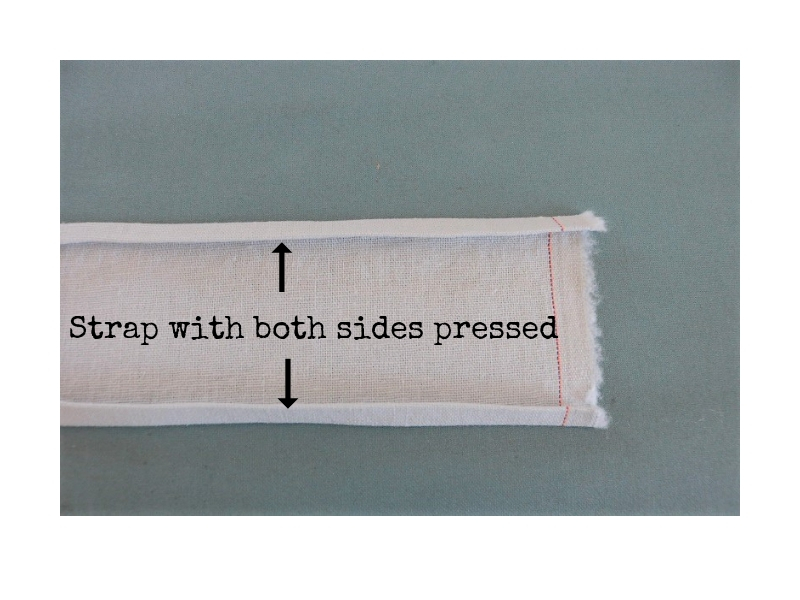
- Press each strap in ¼” down one long length toward wrong side, then ¼” again. (see photos below)
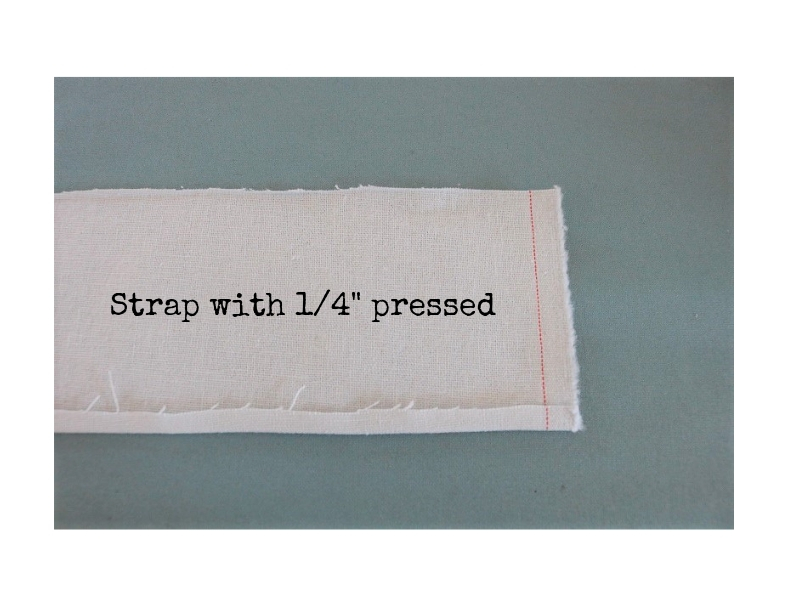
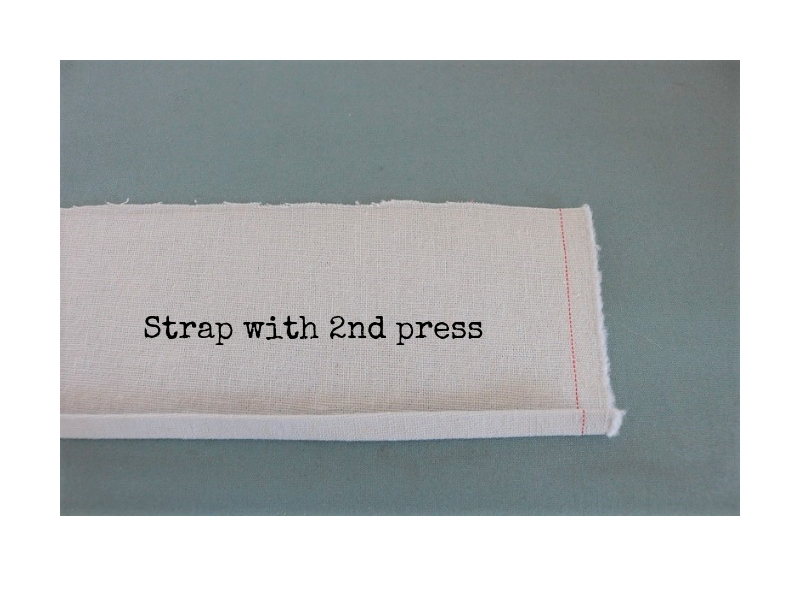
- Do the same for the other long length of the strap.
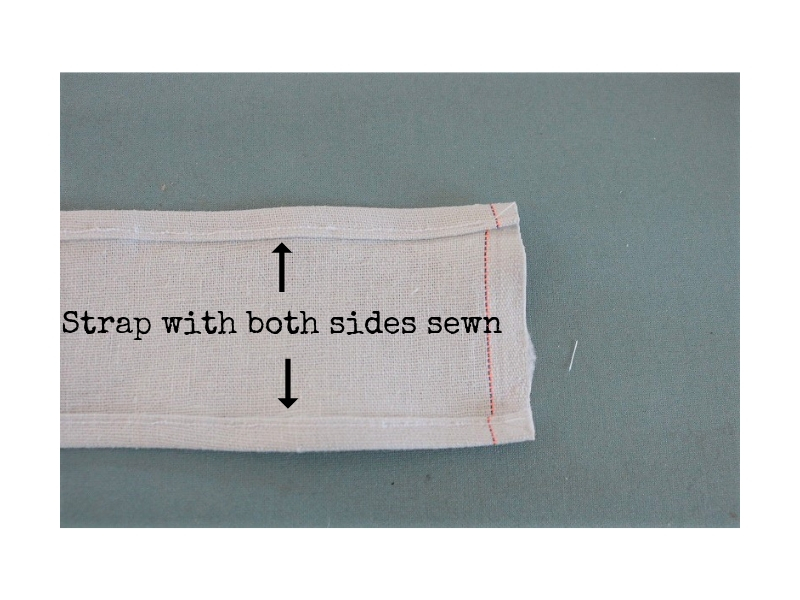
- Sew seam down each long length of strap. Short edges are left raw.
- Repeat with 2nd strap.
Note – If you have more yardage, it would be easier to make these straps as ‘tubes’. For instance, you could cut them out at 6″ widths each, press them length-wise right sides facing, sew seam down long raw edges, then turn them right side out and press. Easy, and less pressing with the iron! However, I designed my straps considering a limit of one yard of fabric.
Step 2 – Hem Apron Body
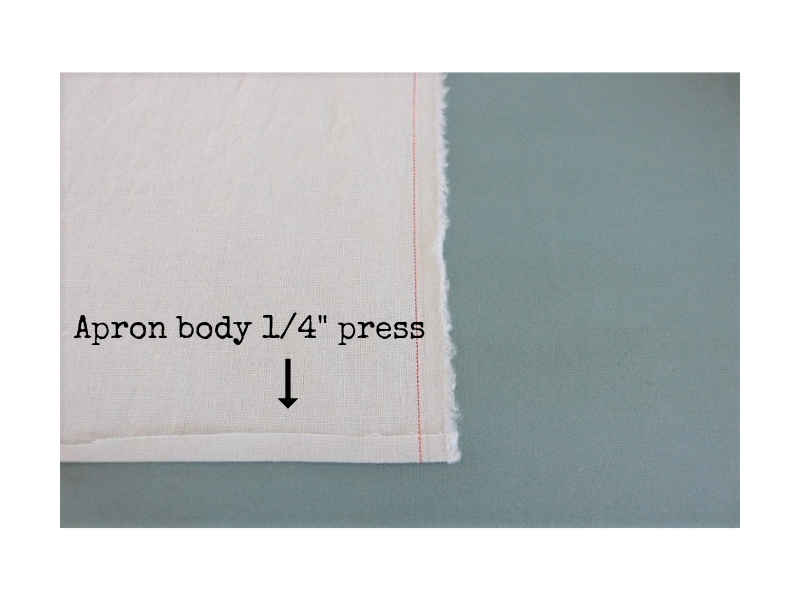
- Press ¼” hem along top width of apron body toward wrong side. Fold that in another ½” and press. Repeat for bottom width of apron body. Pin bottom hem in place.
- Press ¼” in on each 30” side of apron body toward wrong side. Fold each in another ½” and press. Pin each side in place. (see photos below)
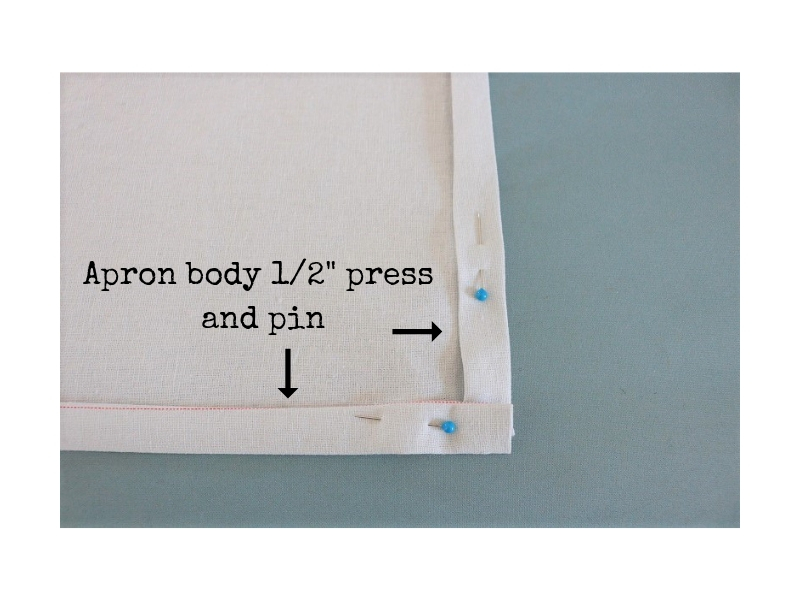
- Sew a seam down one side of apron body starting 2” down, then the bottom of apron, then the other side ending 2” from top, but do not sew the top of apron body yet. (The 2” you skipped at each top corner will be where you place the straps).
Step 3 – Attach Straps to back of Apron Body
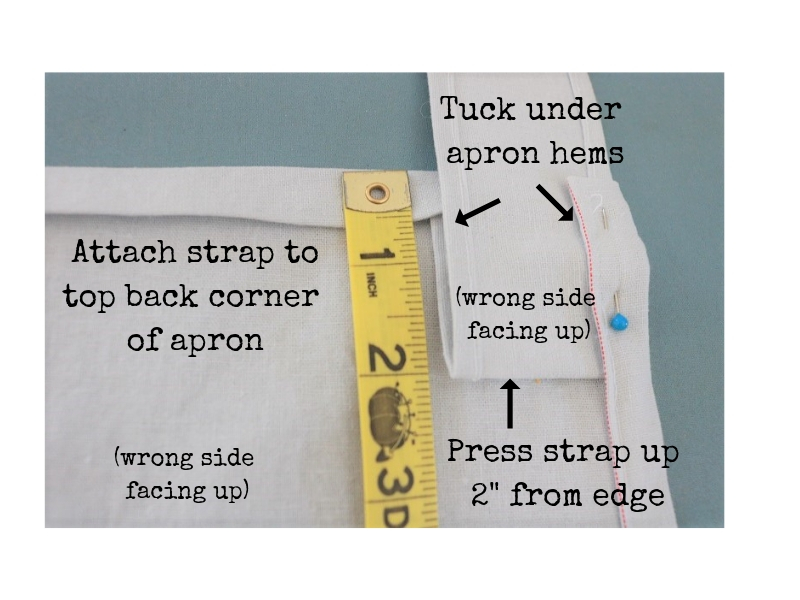
- With wrong side of apron body facing up, tuck a short raw edge of 1st strap under a top hem corner, right side of strap facing up.
- Measure 2” down from top hem, and press the strap upward there with wrong side of strap facing up.
- Tuck this folded section of strap under the side apron hem as well as the top apron hem and pin in place. (this is where you left 2” open on top sides of apron in Step 2) You want the strap to be tucked in at the exact corner of the apron body. (see photo below)
- Repeat with 2nd strap on opposite top corner of apron body.
Step 4 – Attach Straps to front of Apron Body
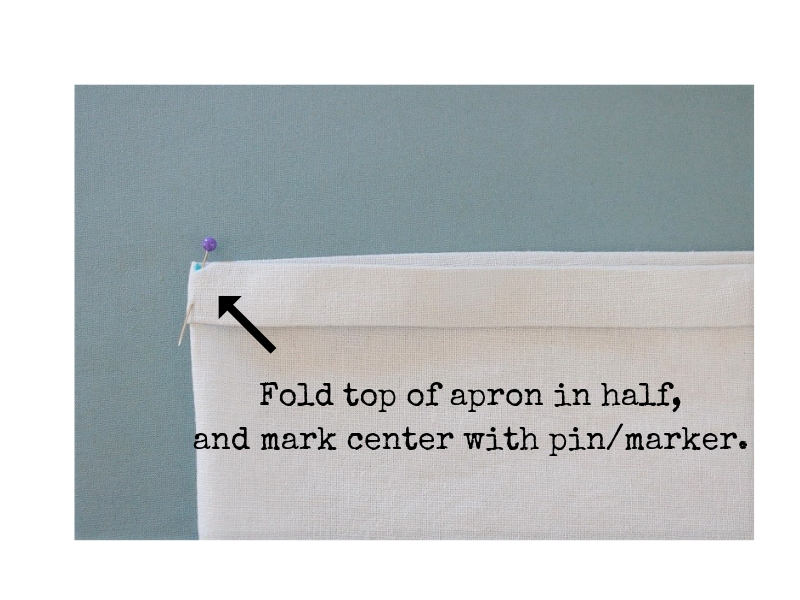
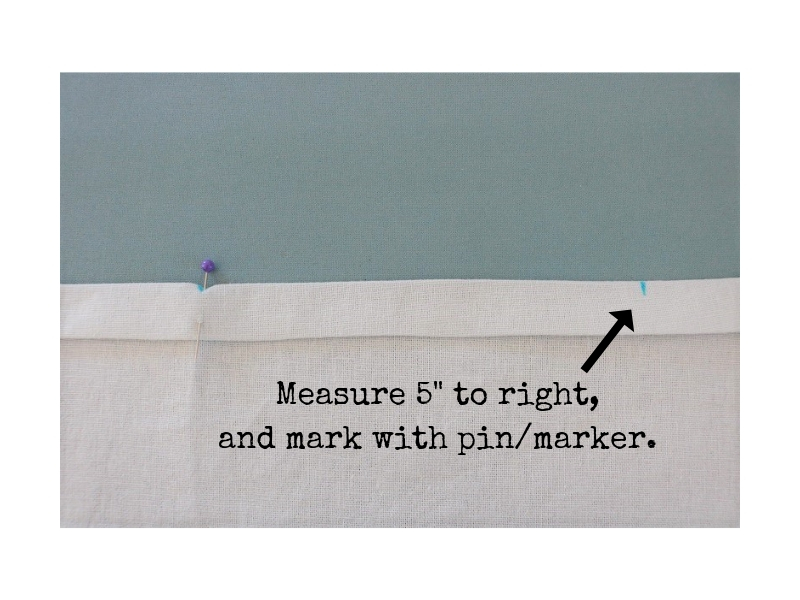
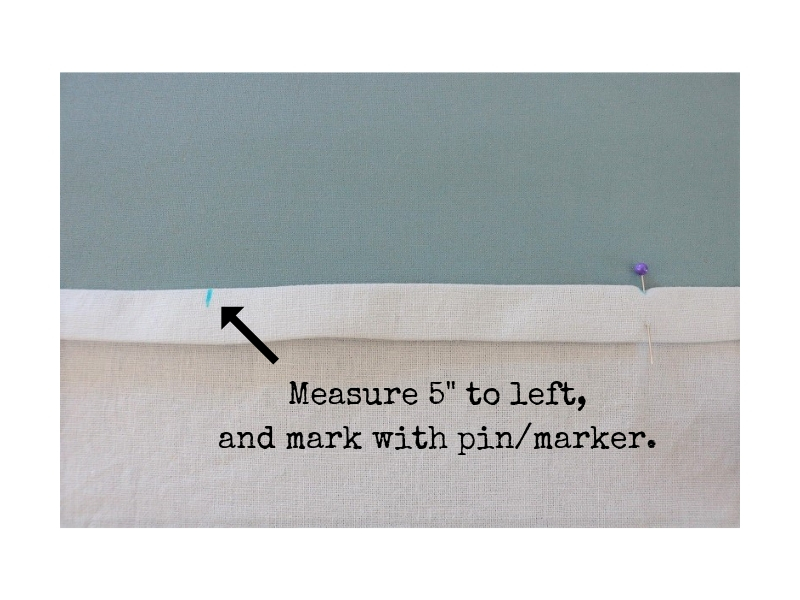
- Fold apron body in half horizontally to find center, and mark the top center with a pin or washable fabric marker (as shown in photo below). Open apron back up and lay with wrong side facing up.
- Measure 5” to the right of your center mark and mark this point with a pin or marker.
- Measure 5” to the left of your center mark and mark this point with a pin or marker. (These points are where the straps will attach to the front of your apron, just above chest level. See photos below).
Now….try the apron on:
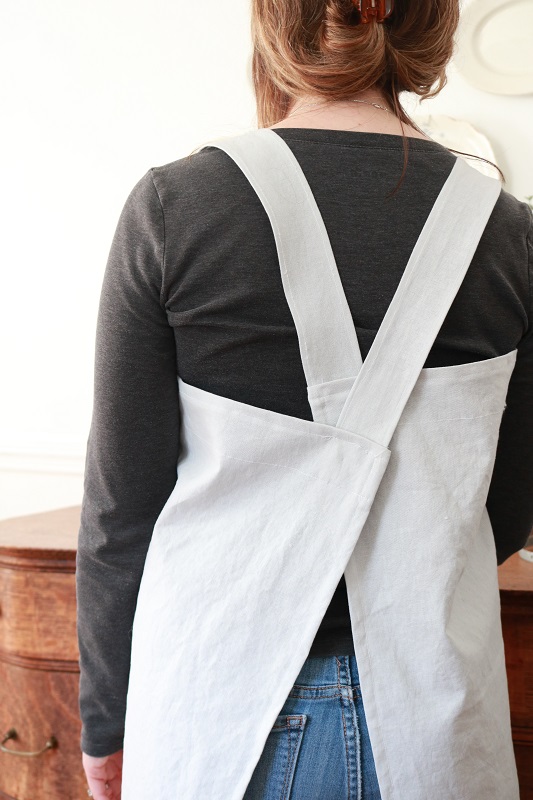
At this point you will want to cross the straps (being careful not to twist them) and try on the apron to determine the optimal fit. (Bring the back right strap over your left shoulder, and center it at the left mark at the top of your apron, and vice versa). Hold the top of the straps to the front of the apron and adjust their height to determine where you want the straps to go. Once you are happy with the fit, place a pin through each strap horizontally at the point where they meet the top front of the apron. This will mark the ideal spot to connect the straps with the front of the apron.
- Trim the raw edge of one strap so that there is 2″ after your horizontal pin. Cut the other strap so that it is equal in length to the first strap. (I’m short, so I ended up trimming 16″ off each strap!)
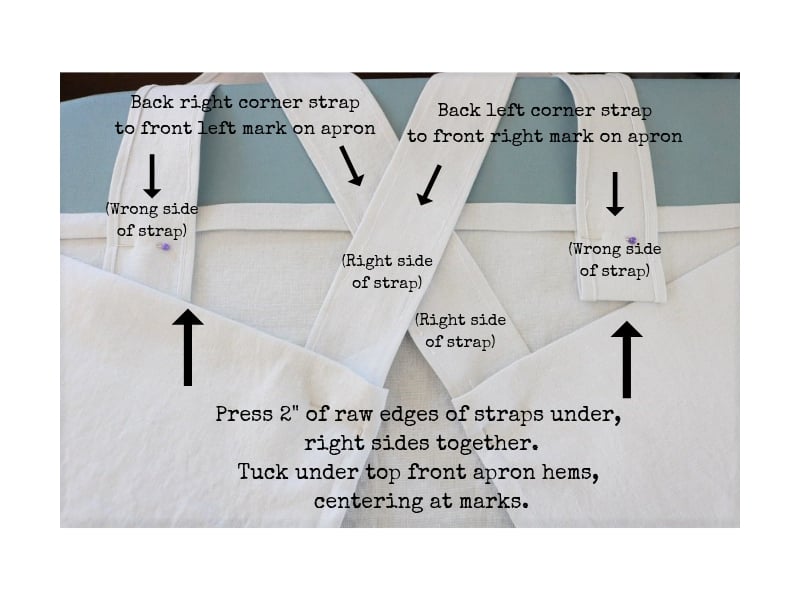
- Press 2” in on the short raw edge of 1st strap, right sides together. Repeat for 2nd strap.
- Ensure right back strap crosses over to attach to front left side of apron and vice versa, being careful not to twist straps.
- Tuck the pressed short edge of the right back strap under the wrong side of the top front left hem of the apron body, about 2” down (centering it where you had marked the strap to be). Ensure wrong sides of strap are facing up. Pin in place. (see photo)
- Repeat to place short edge of left back strap to top front right of apron body. (See photo below for placement of front straps)
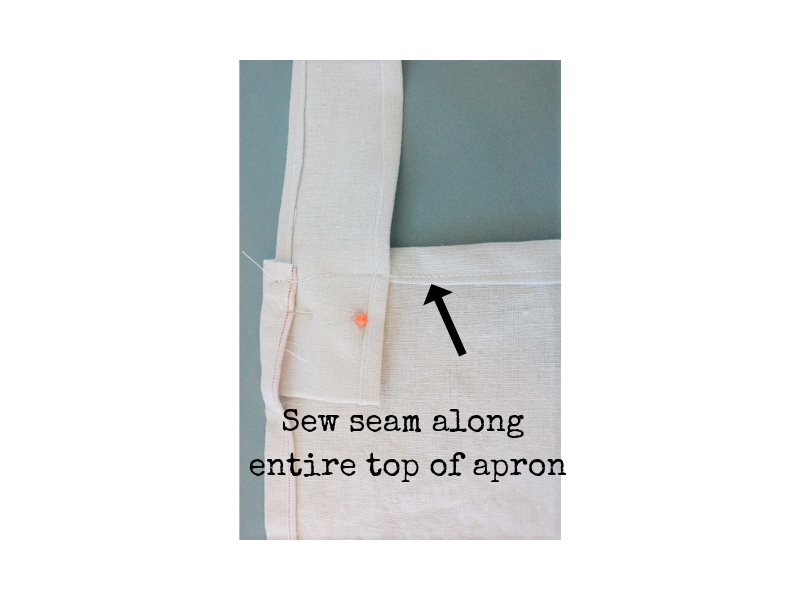
Step 5 – Sew Two Seams to Secure Straps to Apron
- With both straps pinned to back corners and front of apron body, sew a seam along entire top hem of apron, securing the straps as you sew. Backstitch at beginning and end of seam. (see photo below)
- Measure and mark 1 ¾” down from top of apron and sew another horizontal seam there across width of apron body, securing bottom of straps as you sew. Backstitch at beginning and end of seam. (see photo below)

- Lastly, sew top side corners in back of apron, finishing the side hem you skipped in Step 2. This will also secure the back straps under the side hems.
Step 6 – (Optional) Attach pocket to Apron Body
- Decide where you want your pocket and pin in place, with preferred right side of pocket facing out.
- With embroidery thread, use a blanket stitch on the 2 sides and bottom of pocket to attach it to the apron. You can find instructions for a blanket stitch in this video.
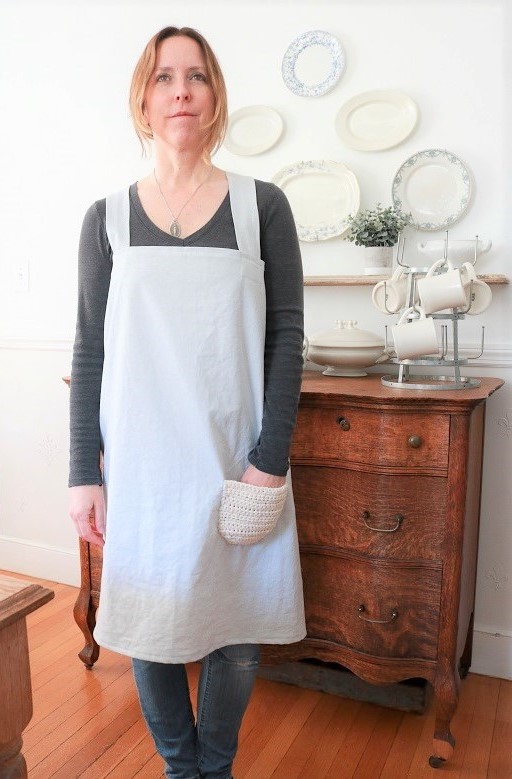
FINISHED APRON!
That’s it! Try it on and enjoy.
===> You can also find this pattern (Ad-free) as a pdf file in my Etsy shop for a modest price. ===>
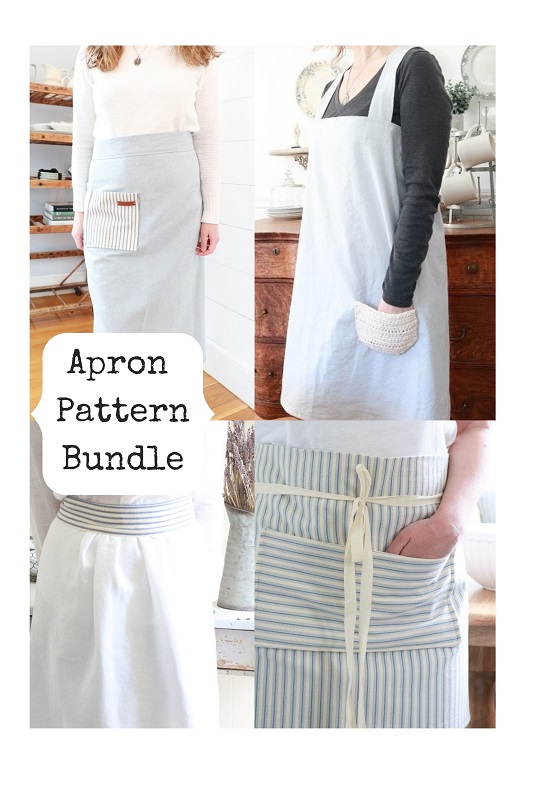
The apron is included in a SEWING PATTERN BUNDLE OF 4 APRONS for one low price on Etsy!
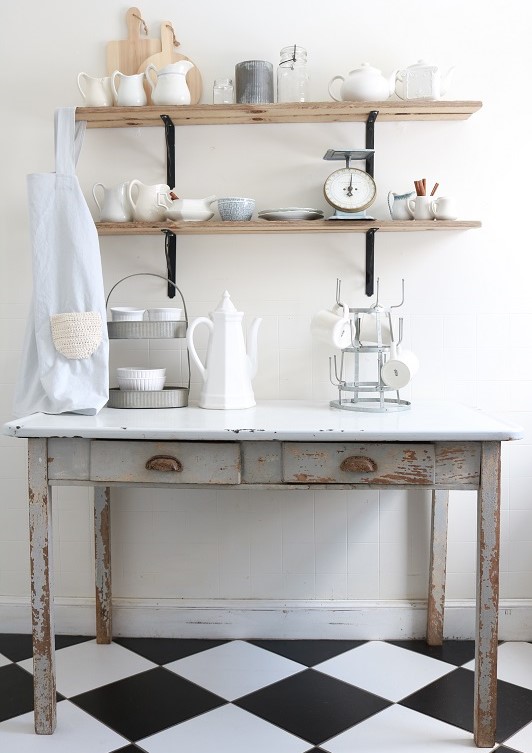
Hang in up in your farmhouse kitchen and it will fit right in…
Other Farmhouse Style Patterns
If you’re inspired by this project, be sure to check out my other popular FARMHOUSE STYLE HALF-APRON PATTERN:

Or this LONG HALF APRON PATTERN:
After you sew an apron, try your hand at these farmhouse kitchen crafts, too:
Want to remember this project? Post this Cross Back Apron pattern to your favorite Pinterest board!


8 Comments
Pingback:
Pingback:
Pingback:
Pingback:
Lorelei
So cute. Thanks for sharing.
Susan
Thanks so much, Lorelei!
Michelle
This is absolutely farmhouse fantastic! It would’ve been perfect for our VB days…. with one big pocket in the front for our cash and order pads. I just adore it! Well done Mon Amie and, as always, thank you for sharing.
Susan
Yes, Michelle! This apron would have been a great vendor apron for our bazaar days. Maybe again some day…